
Kioshi
-
Posts
2439 -
Joined
-
Wow really? I have a 32 Spines/Dark, it crits all the time. And I played her very little, like once per month or so.
Ok I also have a 33 spines/fire but she's an AE baby when I was abandoning the game. level 33, no enhancements, 200 million and a lotg +rech in her inventory I have no idea where I got lol. -
Quote:Oh you're rich. I spent 2 months to make my ice/psi dom perma (80% rech) in i11 AFTER she hit 50 and I only used 2 purple sets, the confuse one (cheap) and the immob (moderately expensive).Originally Posted by Santorican
 I'm not rich I'm just old
That is a really really really nice build, it has excellent defense and endurance usage and recovery. The only small suggestion I can give you depending on what their price differences are is to slot two Enzyme Exposures into CoD instead of Cytos it will give you a few decimals more of defense
But I have a question, Sant (thanks for the compliment btw). Enzymes enhance defense debuff. Are they bugged so that they enhance defense buffs too? -
I have a little more hp and better defs but only 38.8% recharge (no purps, not rich like you lol). But looks good to me, Spine Burst only recharges 1 sec later out of hasten compared to your build. Throw Spines otoh... bad recharge, damn positron set.
I still don't know if I'll level her tho (she's 32), the ST damage is driving me nuts. I teamed with a 50 Spines/Dark yesterday and I was on my DM/DA. I felt bad for him because he took SO LONG to take down an orange boss.
Hero Plan by Mids' Hero Designer 1,704
http://www.cohplanner.com/
Click this DataLink to open the build!
X-26: Level 50 Mutation Scrapper
Primary Power Set: Spines
Secondary Power Set: Dark Armor
Power Pool: Fitness
Power Pool: Leaping
Power Pool: Speed
Power Pool: Fighting
Ancillary Pool: Body Mastery
Hero Profile:
Level 1: Lunge -- T'Death-Acc/Dmg(A), T'Death-Dmg/EndRdx(3), T'Death-Dmg/Rchg(3), T'Death-Acc/Dmg/EndRdx(5), T'Death-Dmg/EndRdx/Rchg(5), T'Death-Dam%(45)
Level 1: Dark Embrace -- ImpArm-ResDam/EndRdx(A), ImpArm-ResDam/Rchg(7), ImpArm-ResDam/EndRdx/Rchg(7), ImpArm-ResDam(9)
Level 2: Spine Burst -- Oblit-Dmg(A), Oblit-Acc/Rchg(9), Oblit-Dmg/Rchg(11), Oblit-Acc/Dmg/Rchg(11), Oblit-Acc/Dmg/EndRdx/Rchg(13), Oblit-%Dam(13)
Level 4: Murky Cloud -- ImpArm-ResDam/EndRdx(A), ImpArm-ResDam/Rchg(15), ImpArm-ResDam/EndRdx/Rchg(15), ImpArm-ResDam(17)
Level 6: Hurdle -- Jump-I(A)
Level 8: Impale -- Thundr-Acc/Dmg(A), Thundr-Dmg/EndRdx(17), Thundr-Dmg/Rchg(19), Thundr-Acc/Dmg/Rchg(19), Thundr-Acc/Dmg/EndRdx(21), Thundr-Dmg/EndRdx/Rchg(50)
Level 10: Obsidian Shield -- HO:Ribo(A), S'fstPrt-ResKB(23), S'fstPrt-ResDam/EndRdx(23), S'fstPrt-ResDam/Def+(46)
Level 12: Combat Jumping -- LkGmblr-Rchg+(A)
Level 14: Health -- Numna-Regen/Rcvry+(A), Mrcl-Rcvry+(25)
Level 16: Dark Regeneration -- M'Strk-Acc/EndRdx(A), Nictus-Acc/EndRdx/Rchg(33), Numna-EndRdx/Rchg(33), Numna-Heal/EndRdx/Rchg(34), Numna-Heal/Rchg(34), Theft-+End%(34)
Level 18: Quills -- M'Strk-Dmg/EndRdx(A), M'Strk-Acc/Dmg/EndRdx(27), M'Strk-Acc/Dmg(27), M'Strk-Dmg/Rchg(29), M'Strk-Acc/EndRdx(29), M'Strk-Dmg/EndRdx/Rchg(31)
Level 20: Stamina -- P'Shift-EndMod(A), P'Shift-EndMod/Rchg(21), P'Shift-EndMod/Acc(25), P'Shift-End%(31)
Level 22: Death Shroud -- M'Strk-Acc/EndRdx(A), M'Strk-Acc/Dmg(36), M'Strk-Dmg/EndRdx(36), M'Strk-Dmg/Rchg(36), M'Strk-Acc/Dmg/EndRdx(43), M'Strk-Dmg/EndRdx/Rchg(45)
Level 24: Build Up -- GSFC-ToHit(A), GSFC-ToHit/Rchg(39), GSFC-ToHit/Rchg/EndRdx(40), GSFC-Rchg/EndRdx(46), GSFC-ToHit/EndRdx(46), GSFC-Build%(50)
Level 26: Ripper -- Oblit-Dmg(A), Oblit-Acc/Rchg(37), Oblit-Dmg/Rchg(37), Oblit-Acc/Dmg/Rchg(37), Oblit-Acc/Dmg/EndRdx/Rchg(39), Oblit-%Dam(39)
Level 28: Cloak of Darkness -- HO:Cyto(A), HO:Cyto(31), LkGmblr-Rchg+(33)
Level 30: Hasten -- RechRdx-I(A), RechRdx-I(40), RechRdx-I(40)
Level 32: Throw Spines -- Posi-Acc/Dmg(A), Posi-Dmg/Rchg(42), Posi-Dmg/Rng(42), Posi-Acc/Dmg/EndRdx(42), Posi-Dam%(43), TmpRdns-EndRdx/Rchg/Slow(43)
Level 35: Oppressive Gloom -- Acc-I(A)
Level 38: Boxing -- KntkC'bat-Knock%(A)
Level 41: Tough -- HO:Ribo(A), HO:Ribo(45), HO:Ribo(48)
Level 44: Weave -- GftotA-Def/EndRdx(A), GftotA-Def/Rchg(48), LkGmblr-Rchg+(48), LkGmblr-Def/EndRdx(50)
Level 47: Conserve Power -- RechRdx-I(A)
Level 49: Physical Perfection -- P'Shift-EndMod(A)
------------
Level 1: Brawl -- Empty(A)
Level 1: Sprint -- Empty(A)
Level 2: Rest -- Empty(A)
Level 1: Critical Hit
Level 0: Ninja Run
------------
Set Bonus Totals:- 11% DamageBuff(Smashing)
- 11% DamageBuff(Lethal)
- 11% DamageBuff(Fire)
- 11% DamageBuff(Cold)
- 11% DamageBuff(Energy)
- 11% DamageBuff(Negative)
- 11% DamageBuff(Toxic)
- 11% DamageBuff(Psionic)
- 11,8% Defense(Smashing)
- 11,8% Defense(Lethal)
- 6,13% Defense(Fire)
- 6,13% Defense(Cold)
- 8% Defense(Energy)
- 8% Defense(Negative)
- 6,75% Defense(Psionic)
- 20,5% Defense(Melee)
- 9,25% Defense(Ranged)
- 9,25% Defense(AoE)
- 4,5% Max End
- 34% Enhancement(Accuracy)
- 38,8% Enhancement(RechargeTime)
- 14% FlySpeed
- 115,5 HP (8,62%) HitPoints
- 14% JumpHeight
- 14% JumpSpeed
- Knockback (Mag -4)
- Knockup (Mag -4)
- MezResist(Held) 2,75%
- MezResist(Immobilize) 2,75%
- MezResist(Sleep) 3,3%
- MezResist(Stun) 7,7%
- 18% (0,3 End/sec) Recovery
- 22% (1,23 HP/sec) Regeneration
- 3,47% Resistance(Fire)
- 3,47% Resistance(Cold)
- 14% RunSpeed
Code:| Copy & Paste this data into Mids' Hero Designer to view the build | |-------------------------------------------------------------------| |MxDz;1406;707;1414;HEX;| |78DA9D93594F135114C7EF305387D21D282D3B428142E9404D302E094645130D4D9| |01262146846B842636DEBCC90C89B1FC0274DF4095902A8F1D1B8C58FE652CF72DB| |C4F8E6A4FDFFE69E39DBBD6726FF743E28C4B32B420B5F2FDBAE5B2C6C3876AD269| |DD6FC8E677BA56AC5B89B3D77DE1442C41B8F8A795996D2BAB3532A97DDDEA6755E| |3E9415575AF3B6F3A878D5795C7562B72ADBD29115CF6ADC0417ABD5B275B3E455A| |4EBF26241DAB55265AB8D16859A949B21E5B4B5EDC183D88D5A69C3BA56DDDC2DE6| |6DD793CE6E129A9980FF3E764557DD27EE018645CB7DC62AC15863AC13A68A84098| |CD2284A17290D4D674619E384D634E1C0546E905DFBD1424F7E12DA7E317E138275| |86D0111988D255769DB387397B98B34739FB19F0F3B19FF0A5A9B1233099AAA0B94| |7A6E81B42FB3EE380D07948C81DF1AE20C4AF0AFAE70086105D4930F48BAE2E4236| |C12B700CA88A813835618229C415B5D00A9992B709597812A1EDD77D11179013430| |99DB0440E6797190546BB8E258E212AC6257CB127D45E8FC7A811FA1C864B18D821| |B4425487DA41C70B3ACCCE9784E42BC2C06BC224F8C555F6386718E1B4235C6B84B| |34F72C929CE7E08510975AA89634A347642183F2564DF32DE1172EF092710D5ADA2| |BA79F8291E7E8A879FE2E18FF1F0C778F81644F572872DBDB3380B5D0CCCF24C86F| |8C8874D3C2876E9CFD0C18EFF855370185495073FF21BFB89F199F18577F995F181| |D2CE98A83CDCE11E4AA4816954994697C95907535AF5979EE3FEA614A7150DF0C9A| |869640C4A3EED63F00E72514201766CA9F45686D29FC2BB34A3DEB0191E649FD1FC| |44E1079758F8C7B268343F34A19165D0687EA2757F943C053BFFD7F52DD848E75F6| |A035D465904D156F06E15650D97EB7867E3DD03940D5CD6BF071B0D472E605F1751| |2EA15C4689437FE2397A9A0190004A102584124689A044513A507A50F650EA7F000| |8FFF2F0| |-------------------------------------------------------------------|
-
Ohhh the multi quote button is working again on my google chrome, go figure.
Quote:Dude. seriously... No fear power causes enemies to run. I mean fear powers that make the enemies get the 'scared' face, like Fearsoe Stare, CoFear, Touch of Fear, Stalker AS demoralize, not 'afraid' powers like Burn which causes the enemies to flee. You're mixing things up.Originally Posted by je_saist
Cloak of Fear, and Oppressive Gloom can have opposite effects: Cloak of Fear will cause minions to run away, Death Shroud is supposed to cause minions to run to you. Cloak of Darkness has a stealth component, that interferes with Death Shrouds ability to hold aggro
As Sarrate already said, it's a mag 12 stun (I can assure it's less than 17 at least since my Granite Brute doesn't get stunned). GW's hold is mag 100.Quote:Originally Posted by ClawsandEffect
Nope. It's a mag FIFTY stun. It will stun anything in range of it that doesn't have a crapton of Clear Mind (or similar) stacked on it. It's every bit as nasty as Ghost Widow's hold.
(It is pretty much identical in effect to the power Soul Transfer from Dark Armor, and the Warshade power I can never remember the name of)
Soul Transfer is a mag 30 stun. Stygian Return (Warshade self rez) does not stun. -
Quote:Yup, never been stunned by him on my granite Brute even with rooted off. Granite Armor provides mag 17 protection against stun (add rooted and it's 27.4 but if the stun were mag 50 I'd be stunned anyway).Originally Posted by Sarrate
Hardly; his rez is a 15 sec MAG 12 stun, not 50. I've never been stunned by him on my WP Tank, with just shy of MAG 13 protection (no SoW).
So it's gotta be around mag 12, since my scrappers get stunned by him and scrappers usually get 10 - 10.4 mag protection. -
Quote:Shadow Maul is awesome. Low end cost, high damage and you can easily hit 3 mobs with practice, it's 'worth' its end cot and damage even if you hit one. Remember it's the only AoE in dark melee (I don't count soul drain or d. consumption as AoEs). It does more damage and costs less end and recharges faster than Siphon Life if you hit one mob. And you can hit 5 quite often after practice when you have lots of enemies in the cone.Originally Posted by AF_Bill
Shadow Maul has its strong points, but is not a great AoE power due to the short radius. It has great damage and the duration would help with the builds lack of overall recharge. I might try to squeeze it in to help with slotting def, but I dont think it will make the final cut.
Having practiced with Shadow Maul by taking a DM scrapper to 50 in i9/i10 when it took months to level also helped me a lot on my squishies on the lower levels after I got sands of mu, and also made me make good use of Jacob's Ladder from ELM. -
To be honest, your team will barely notice the difference if you're super-IOed or not if they're decent players, even at higher difficulties.
4 examples:
1) Took my SO'ed Spines/Dark on a Striga story arc, I was the only melee. Support was 2 kins so I had to take alphas (didn't have Tough yet, she isn't 50). With 2 kins, I had a chain of Ripper-Spine Burst-Ripper-Spine Burst and could use dark regen liberally, no end issues with transf and SBoost. If I were all IO'ed out, I think the only difference would be that... well maybe I'd use dark regen less if I built for defense? And that's it, and could be made irrelevant if we had a forcefielder.
2) Inspirations make all the difference!!! I was in a 7 Demon MM team with my stalker (yeah me and 100 demons lol), all mobs were red/purple and I was in my squishiest stalker, elm/regen, the only one with no defenses, and level 25. Some loose demonling pulled Barracuda (pink EB) and she simply decimated all the MMs and demons with her Psi AoEs. I soloed her (a pink EB set for 8) because of of inspirations, used some reds and purples. Now, what I were IO'ed like my planned build for this stalker when he hits 50? I'd have to use insps the same way because I'd have only 25% ranged def (her attacks are mostly psi/ranged) and 32% melee, besides 60% rech. The difference would be that I'd have taken her down faster and used less purples, but that's it. No biggie.
3) Running an +2 ITF, the IO'ed SM/WP Brute died quite a bit, which was usual for our +2, +3 ITFs runs. In another +2 ITF, a SS/WP Brute practically 'soloed' it, meaning he was killing everything extremely fast and jumping into mobs before the rest of the team, leaving my EM/Nin IO'ed Stalker feeling bad since I had no AoEs and even the bosses and problem minions (surgeons) I'd normally go after were going down fast with all the fury the Brute had and the lots of Footstomps per minute took care of the surgeons. After the ITF I asked 'dude what the.... how did you do that? Are you all purpled out?'. He said 'No, I only have a few IOs. The Empath was giving me Adrenalin Boost all the time so my regen, recharge and recovery were absurd all the tf'.
4) Just remembered. Similar to the first one. My DB/Elec scrapper 'tanking' a S. Psyche TF. I had a sonic and a kin with me, so between the ring of -res around me and SB, I was doing damage and chaining attacks like a very well IOed toon.
One toon I can say that makes some difference because of IOs on teams is my Mind/Emp troller, she has 86% global rech and almost perma mez protection, the controls like terrify come up very often, as the regen/recov auras, I have a nice damaging ST attack chain with purple procs that has the added benefit of mezzing most bosses in 2 hits, I can fort a lot of people, so it helps the team a lot, I barely have to heal with so many buffs and controls. But... on my first MoSTF I has like 30% global rech from IOs (no other significant bonuses) and was the only empath. Sure I optimized her to control and buff as much as possible (and there's still room for more but the more recharge I put in this toon, the busier she becomes - so many controls, so many buffs, so she's okay for now), but it's not like she was bad on normal IOs, I did various STFs with her before we had the 'Master of' thing when she had no IOs, except for a -KB I bought early because ya know, KB sucks.
And hey, I know I talked a lot about buffs from defenders and trollers, but even with an odd team composition you can steamroll. I once did a Katie Hannon TF on my DM/DA scrapper with seven blasters. DM is single target and good for taking down bosses. With 7 blasters, there was NOTHING left for me to kill, I felt truly useless. I only felt I was contributing when I had to tank the AV (Mary) but besides that they just killed everything before I could get to the mobs.
That's the cool thing about teaming, you can always contribute and in the presence of buffs you can perform like you spent billions on your toon. Debuffs also make your killing speed much faster and protects you like you had defense/resistance (like Darkest Night).
I went overboard for recharge on my mind/emp for sentimental reasons (first toon, still like playing her), I know that with this recharge she'll be able to do more than I can handle because even SO'ed a mind/emp is a very busy toon already.
I'll go overboard on my fire/sd because I want to farm with her, same for my SS/Fire Brute. And eventually on my claws/SR because I want to solo crazy stuff with no insps.
Of course when the players are plain bad an IOed toon can make a lot of difference. An ingame friend asked me for help on a mission, I said yes (my dm/da scrapper, 50 and 'decently' IO'ed, nothing too fancy) and when I saw it was an 8-man team I asked 'WTH....' and he said the mission was too difficult. It wasn't, the players sucked big time, all the mobs had ranged psi attacks (Mother Mayhem mission) and the FF defender didn't have the ranged shield for example which would have turned the mission into a cakewalk. When the AV appeared, the players did some stupid stuff, like the other scrapper going off to fight a faraway mob (and dying) and before I could get there, the peacebringer was trying to blast ALONE at the AV, obviously he got two shotted. Instead of regrouping and stuff, the blaster also tried to take her alone, etc. I got tired of all the stupidity (yes I was saying 'we need to regroup, wait to take her on when we're together, hey other scrapper come here and stop trying to solo that random mob' but they wouldn't listen) so I decided to solo her since /DA resists psi well (capped the resist with one orange) and I had lots of red and blue insps.
I know I wrote too much (I don't feel like playing the game much after i17 because it's looking like crap - Intel GPU issues, so I stay in the forums since this would be my playtime now), but you can always contribute to the team and nobody ever asked if my fire kin had softcapped defenses (he's close), if my dm/da had IOs, and nobody ever complained I was using a SO'ed toon or even a subotpimal build - like my ELM/Stone Brute, I got him to 50 so fast via 2xp+ITFs that his build when he hit 50 was horrible by my standards, he died when he shouldn't sometimes and nobody said anything - maybe they'd complain a bit if I died at every mob lol, but on a Granite toon you have to try hard to do it.
So don't worry about IOs if yu don't want to. I'd only recommend you to get 'quality of life IOs' that aren't expensive and greatly improve your toon's survivability, like a -KB IO if you don't have protection, a steadfast +3 def for a defense toon... When I was 28 on my fm/sd, I took 3 trips to Dark Astoria, got some rare salvage and recipes, made 50 million and managed to buy a kismet +acc and the steadfast +3 def IO, both improved her quite a bit at these levels. But I'd say a -KB IO (I think Karma is the cheapest) is the one you'd need the most, especially on a melee toon with no kb protection like fire armor, dark armor, ninjitsu, etc. -
Quote:You're right, according to CoData on Quills:Originally Posted by Werner
It includes whatever Mids' is including as average unslotted damage. I'm pretty sure it includes criticals. Can't remember which rate. I like using 10% personally, since I don't care about minions except as fuel.
9.38 Lethal damage
+3.576s Immobilize (mag 0.33) PvE only
FlySpeed, RunSpeed, SpeedJumping -0.16 for 3s
JumpHeight -16% for 3s [Ignores Enhancements & Buffs]
9.38 Lethal damage (5% chance) If target is a minion
9.38 Lethal damage (10% chance) If target is not a minion or player -
I use Eset Smart Security (the more 'complete' version of NOD32). Doesn't seem to slow my system down, not bloated, daily updates, but not free either.
Found an interesting article about differences on suites, free programs, simple antivirus, etc. and its from April 21st, more than 30 reviews. -
That's just great. Stalker fix yay!
I only have one question (out of curiosity). Do you have a plan on how to add diminishing returns for pvp? Because even the pro players who pvp all the time with the combat monitors on don't have a clear idea on how much anything gets DR'ed in pvp. -
Sorry St0n3y didn't know it was a known issue. Hadn't looked at Khelds for like 2 years.
And OMG you fixed the Stalker Patron bug! You're awesome, I had no hopes for this
-
I found it easy to counter the CoT ambushes. Front door and city hall with no deaths, 8 people team. And we were only in 6 in this part, all melee, because the two trollers were shopping.
Anyway, back on topic, I did the TF once and all of the 8 shadows showed up (nice touch, they even had the same SG names as us).
We got trounced by them the first time because three of the scrappers rushed in without waiting for the 2 /rad trollers, so I went in with my scrap too (we were 6 scrappers+2 rads). They hit really hard!
The shadows were real easy the second time, I just popped some purples and waited for the rads to anchor first, I didn't even get hit. Ok not real easy, they took quite a while to kill and two of the scrappers died, but no big deal.
I think it was some isolated happening you had (only 1 shadow), normally all the shadows appear from what I've heard from other people since I only did the TF once. -
How bout this? TONS of recovery and conserve power, hasten 1 second downtime:
Hero Plan by Mids' Hero Designer 1,703
http://www.cohplanner.com/
Click this DataLink to open the build!
Level 50 Magic Scrapper
Primary Power Set: Dark Melee
Secondary Power Set: Super Reflexes
Power Pool: Fitness
Power Pool: Speed
Power Pool: Leaping
Power Pool: Fighting
Ancillary Pool: Body Mastery
Hero Profile:
Level 1: Smite -- Hectmb-Dmg/Rchg(A), Hectmb-Acc/Dmg/Rchg(3), Hectmb-Acc/Rchg(3), Hectmb-Dmg/EndRdx(5), Hectmb-Dam%(5), DampS-Rchg/EndRdx(13)
Level 1: Focused Fighting -- LkGmblr-Def/EndRdx(A), LkGmblr-Def/EndRdx/Rchg(7), LkGmblr-Def(7), LkGmblr-Rchg+(9)
Level 2: Shadow Maul -- Armgdn-Dmg/Rchg(A), Armgdn-Acc/Dmg/Rchg(9), Armgdn-Acc/Rchg(11), Armgdn-Dmg/EndRdx(11), Armgdn-Dam%(13)
Level 4: Focused Senses -- LkGmblr-Def/EndRdx(A), LkGmblr-Def/EndRdx/Rchg(15), LkGmblr-Rchg+(15)
Level 6: Hurdle -- Jump-I(A)
Level 8: Siphon Life -- HO:Nucle(A), HO:Nucle(17), HO:Nucle(19), HO:Golgi(19), HO:Golgi(21), HO:Golgi(21)
Level 10: Practiced Brawler -- EndRdx-I(A)
Level 12: Hasten -- RechRdx-I(A), RechRdx-I(23), RechRdx-I(25)
Level 14: Health -- Numna-Heal/EndRdx(A), Numna-Heal(17), Numna-Regen/Rcvry+(23), Numna-EndRdx/Rchg(42), Numna-Heal/Rchg(42), Numna-Heal/EndRdx/Rchg(43)
Level 16: Dodge -- LkGmblr-Def(A), LkGmblr-Rchg+(25)
Level 18: Combat Jumping -- LkGmblr-Rchg+(A)
Level 20: Stamina -- P'Shift-EndMod(A), P'Shift-EndMod/Rchg(33), P'Shift-EndMod/Acc/Rchg(34), P'Shift-Acc/Rchg(34), P'Shift-EndMod/Acc(40), P'Shift-End%(40)
Level 22: Quickness -- Run-I(A)
Level 24: Agile -- LkGmblr-Def(A), LkGmblr-Rchg+(27)
Level 26: Soul Drain -- Oblit-Dmg(A), Oblit-Acc/Rchg(27), Oblit-Dmg/Rchg(29), Oblit-Acc/Dmg/Rchg(29), Oblit-Acc/Dmg/EndRdx/Rchg(31), Oblit-%Dam(31)
Level 28: Boxing -- Amaze-Stun/Rchg(A), Amaze-Acc/Stun/Rchg(43), Amaze-Acc/Rchg(46), Amaze-EndRdx/Stun(48), Amaze-ToHitDeb%(50)
Level 30: Tough -- S'fstPrt-ResDam/Def+(A), TtmC'tng-ResDam/EndRdx(31), TtmC'tng-ResDam/EndRdx/Rchg(33), TtmC'tng-ResDam(33)
Level 32: Midnight Grasp -- C'ngImp-Acc/Dmg(A), C'ngImp-Dmg/Rchg(34), C'ngImp-Acc/Dmg/Rchg(37), C'ngImp-Acc/Dmg/EndRdx(37), C'ngImp-Dmg/EndRdx/Rchg(37), DampS-Rchg/EndRdx(40)
Level 35: Weave -- RedFtn-Def/EndRdx(A), RedFtn-Def/Rchg(36), RedFtn-Def/EndRdx/Rchg(36), RedFtn-Def(36), RedFtn-EndRdx(43)
Level 38: Evasion -- GftotA-Def/EndRdx(A), GftotA-Def(39), GftotA-Def/EndRdx/Rchg(39), GftotA-Run+(39)
Level 41: Lucky -- GftotA-Def(A), GftotA-Run+(42)
Level 44: Focused Accuracy -- GSFC-ToHit(A), GSFC-ToHit/Rchg(45), GSFC-ToHit/Rchg/EndRdx(45), GSFC-Rchg/EndRdx(45), GSFC-ToHit/EndRdx(46), GSFC-Build%(46)
Level 47: Physical Perfection -- Mrcl-Rcvry+(A), Mrcl-Heal(48), Mrcl-Heal/EndRdx(48), P'Shift-End%(50)
Level 49: Conserve Power -- RechRdx-I(A), RechRdx-I(50)
------------
Level 1: Brawl -- Empty(A)
Level 1: Sprint -- Empty(A)
Level 2: Rest -- Empty(A)
Level 1: Critical Hit
Level 6: Ninja Run
------------
Set Bonus Totals:- 10% DamageBuff(Smashing)
- 10% DamageBuff(Lethal)
- 10% DamageBuff(Fire)
- 10% DamageBuff(Cold)
- 10% DamageBuff(Energy)
- 10% DamageBuff(Negative)
- 10% DamageBuff(Toxic)
- 10% DamageBuff(Psionic)
- 6,13% Defense(Smashing)
- 6,13% Defense(Lethal)
- 5,81% Defense(Fire)
- 5,81% Defense(Cold)
- 6,13% Defense(Energy)
- 6,13% Defense(Negative)
- 3% Defense(Psionic)
- 9,25% Defense(Melee)
- 9,25% Defense(Ranged)
- 8,63% Defense(AoE)
- 1,8% Max End
- 82,5% Enhancement(RechargeTime)
- 6% Enhancement(Heal)
- 70% Enhancement(Accuracy)
- 10% FlySpeed
- 165,7 HP (12,4%) HitPoints
- 10% JumpHeight
- 10% JumpSpeed
- MezResist(Held) 3,3%
- MezResist(Immobilize) 4,4%
- MezResist(Sleep) 2,2%
- MezResist(Stun) 2,2%
- 23,5% (0,39 End/sec) Recovery
- 52% (2,91 HP/sec) Regeneration
- 11,3% Resistance(Fire)
- 8,82% Resistance(Cold)
- 25% RunSpeed
Code:| Copy & Paste this data into Mids' Hero Designer to view the build | |-------------------------------------------------------------------| |MxDz;1407;681;1362;HEX;| |78DA9D934953134114C77BC884C9BE1812D61040319B0CE4C66659A560159840482| |2271587D08494A990CA842A72F30378723D7953D4B327CB8FE632BEA59383DE9C4A| |FEBFEED7EFBD7EBD952EB702423CBF23B4D0BD9665DB47D57AD7EA7464D75DB21AC| |DBA3084109303DB5149B6A434B7ACEE336EA686235BF254B66D69562FB05791A72D| |7929EDE84EFB4C7665BB670E1A81F2F979CBBCDFECB5A56DFBA853ED4879C2F6A2B| |43ACD7623A89C1A673DE845B73BCDBA79F7FCA47F54B2EC9EECF627A0A82CFCBB58| |1D7D8E5BA447842888910C234BD0738C3C21F09550C2288DA25C22A2A16934C6182| |378E204DB506EC2D1B5350AF5AC137C1B8C4D4E7B9BB007EE2E4E3BE2E2B4214E1B| |E27CA3E0E06607E1CE08345D80C9500B3036013A54A4786DC055E6D85F2C43A0976| |385779ED22D80C9AF4AF0E7C994604C300C7008B2833B784055451E121287846C85| |5125E46A8403880A739416E62D9AE025256024AA96146593074C313545EC25EDCCD| |C2BC2FC6BC61B42FA2DE31DA10251719528BE44B5EE83695CCD3ACEB34EF1149730| |324947E3B8277F50FCD44FC2CC2FC66FC2ACC3102E840651D3EA38A71FD048AE485| |82A1196F708857D820BDC93EA9624B18EA498CDD1F4734B0C93D007BF943AC2D453| |AA7CFE9870A3CE386148429AEFA00E510B9C5D5FF051A2EB7E469011E21308136AE| |0BEA88A59D4A19116373D0C83E12554C12FA3F62CC30E591EA9C11EE45599F90F54| |C3AD8F8C2BC627DE8BCF8C2F84ABA010A69AD7DCA544CB3B8C6D42818FAF0AD9573| |8BBB6C257ADC098D1874F147EF089E23F96B23E7C6842234B4A1F3E51C71B8167C3| |A3FFFB7D0B0CD2792B3ED01A4A19443BC4D62394C7D87D822D0B5BC72875EC3ADF0| |38382C3AB58D71ACA3ACA064A1CEA132FD0D3F083F85102284194104A1825821243| |9942798FE2FC01A91EEAE7| |-------------------------------------------------------------------|
-
Quote:I knew Quills did less damage, but it's the only damage aura that crits. Maybe it gets closer to the others because of that?Originally Posted by Werner
Interesting. I knew Fire was better than the others, but I didn't know that Quills was worse:
Quills: 10.3 damage per two seconds, 0.52 EPS, 9.9 DPE
Death Shroud: 12.5 damage per two seconds, 0.52 EPS, 12.0 DPE
Lightning Field: 12.5 damage per two seconds, 0.52 EPS, 12.0 DPE
Blazing Aura: 13.8 damage per two seconds, 0.52 DPS, 13.3 DPE -
Slot Gravity Well with Hecatombs, not for hold. It's your best attack.
Get Gravitic Emanation and use the A. Amazements in it, Inky Aspect is good with 1 acc IO already. Or 1 acc/mez HO if you prefer but I don't see the need. Anyway acc/mez HOs are cheap.
The purple pet BU proc works wonders on your pets, I heard it procs a lot;
Instead of Maneuvers, which you got just for the Lotg mule, get Combat Jumping. You can use the LoTg the same way and get immob protection and still get great combat mobility especially if you trade swift for hurdle.
Trade the stupid fire/cold shield for the energy/negative one if you really want shields since you have perma eclipse.
I took out the steadfast unique to put an endmod in Stygian, that +3 def isn't doing anything for you besides adding 16 hp because of set bonuses.
Well did some changes, ended up changing a lot so I'm posting the build, because you slotted some things weirdly (why a dam/range in dark detonation leaving the acc at 26%? detonation already has a 80 feet range, if you exemp you'll lose your global acc bonuses). Other powers had low acc in them too. I mentioned exemping because you took the shields having perma eclipse... If I wanted to play only at 50 I'd skip them, maybe keep the s/l one.
I don't like your power order very much but I'm too sleepy to change that. I'd get Gravitic Emanation much earlier than in this build I modified, same for Shadow Blast.
I know you have to slot something in Tough... But I don't see differences between 4 and 8 kb protection ingame (and I tested on scrappers, brutes and stalkers who had secondaries with no kb protection so I had to add the IOs), ymmv of course. If you can find a way, try to go for another IO for 12 points of -kb.
EDIT: Oh accuracy is good to have on Eclipse, like Square_One said. I forgot to add that in the build, although you have lot of global acc bonuses. But who knows if you exemp.
My friend farms Battle Maiden at +4/x8/boses to PL others with a similar build, it's impressive.
Hero Plan by Mids' Hero Designer 1,703
http://www.cohplanner.com/
Click this DataLink to open the build!
Ale Lee un human: Level 50 Science Warshade
Primary Power Set: Umbral Blast
Secondary Power Set: Umbral Aura
Power Pool: Fitness
Power Pool: Speed
Power Pool: Leaping
Power Pool: Fighting
Hero Profile:
Level 1: Ebon Eye -- Decim-Acc/Dmg(A), Decim-Dmg/EndRdx(3), Decim-Dmg/Rchg(3), Decim-Acc/EndRdx/Rchg(5), Decim-Build%(5)
Level 1: Absorption -- S'fstPrt-ResDam/EndRdx(A), S'fstPrt-ResKB(7)
Level 2: Gravity Shield -- ImpArm-ResDam/EndRdx(A), ImpArm-ResDam(11), HO:Ribo(11)
Level 4: Orbiting Death -- Armgdn-Dmg(A), Armgdn-Dmg/Rchg(7), Armgdn-Acc/Dmg/Rchg(15), Armgdn-Acc/Rchg(15), Armgdn-Dmg/EndRdx(17), EndRdx-I(17)
Level 6: Swift -- Run-I(A)
Level 8: Hasten -- RechRdx-I(A), RechRdx-I(9), RechRdx-I(9)
Level 10: Combat Jumping -- LkGmblr-Rchg+(A)
Level 12: Sunless Mire -- Oblit-Acc/Dmg/Rchg(A), Oblit-Acc/Dmg/EndRdx/Rchg(13), Oblit-Dmg(13), Oblit-Acc/Rchg(29), Oblit-Dmg/Rchg(39), M'Strk-Dmg/EndRdx/Rchg(42)
Level 14: Health -- Mrcl-Rcvry+(A), Numna-Regen/Rcvry+(19)
Level 16: Shadow Cloak -- LkGmblr-Rchg+(A), RedFtn-EndRdx/Rchg(23), RedFtn-EndRdx(27), RedFtn-Def(31), RedFtn-Def/EndRdx(48), RedFtn-Def/Rchg(48)
Level 18: Gravity Well -- Hectmb-Dmg(A), UbrkCons-Hold/Rchg(19), Hectmb-Dmg/Rchg(31), Hectmb-Acc/Dmg/Rchg(31), Hectmb-Acc/Rchg(34), Hectmb-Dmg/EndRdx(46)
Level 20: Stamina -- Efficacy-EndMod(A), Efficacy-EndMod/Rchg(21), Efficacy-EndMod/Acc/Rchg(21), Efficacy-Acc/Rchg(23), Efficacy-EndMod/Acc(25), Efficacy-EndMod/EndRdx(45)
Level 22: Twilight Shield -- ImpArm-ResDam/EndRdx(A), ImpArm-ResDam(34), HO:Ribo(50)
Level 24: Stygian Circle -- Dct'dW-Rchg(A), Dct'dW-Heal(25), Dct'dW-Heal/EndRdx(27), Dct'dW-EndRdx/Rchg(29), EndMod-I(37), Dct'dW-Heal/Rchg(46)
Level 26: Unchain Essence -- Ragnrk-Knock%(A), Ragnrk-Dmg/EndRdx(43), Ragnrk-Acc/Rchg(43), Ragnrk-Acc/Dmg/Rchg(45), Ragnrk-Dmg/Rchg(45)
Level 28: Inky Aspect -- HO:Endo(A)
Level 30: Dark Detonation -- Posi-Acc/Dmg(A), Posi-Dmg/EndRdx(40), Posi-Dmg/Rchg(40), Posi-Acc/Dmg/EndRdx(40), Posi-Dam%(42)
Level 32: Dark Extraction -- ExRmnt-Acc/Rchg(A), ExRmnt-Acc/Dmg(33), ExRmnt-Acc/Dmg/Rchg(33), ExRmnt-EndRdx/Dmg/Rchg(33), S'bndAl-Dmg/Rchg(34), S'bndAl-Build%(43)
Level 35: Shadow Blast -- Apoc-Dam%(A), Apoc-Acc/Rchg(36), Apoc-Dmg/Rchg(36), Apoc-Acc/Dmg/Rchg(36), Apoc-Dmg/EndRdx(37), Dev'n-Acc/Dmg/EndRdx/Rchg(37)
Level 38: Eclipse -- Aegis-ResDam/Rchg(A), ImpArm-ResDam/Rchg(39), TtmC'tng-ResDam/Rchg(39), RctvArm-EndRdx/Rchg(42)
Level 41: Gravitic Emanation -- Amaze-Stun/Rchg(A), Amaze-Acc/Stun/Rchg(46), Amaze-Acc/Rchg(48), Amaze-EndRdx/Stun(50), Amaze-ToHitDeb%(50)
Level 44: Boxing -- RechRdx-I(A)
Level 47: Tough -- S'fstPrt-ResKB(A)
Level 49: Weave -- LkGmblr-Rchg+(A)
------------
Level 1: Brawl -- Empty(A)
Level 1: Sprint -- Empty(A)
Level 2: Rest -- Empty(A)
Level 1: Dark Sustenance
Level 1: Ninja Run -- Empty(A)
Level 10: Shadow Recall -- Empty(A)
------------
------------
Set Bonus Totals:- 14,5% DamageBuff(Smashing)
- 14,5% DamageBuff(Lethal)
- 14,5% DamageBuff(Fire)
- 14,5% DamageBuff(Cold)
- 14,5% DamageBuff(Energy)
- 14,5% DamageBuff(Negative)
- 14,5% DamageBuff(Toxic)
- 14,5% DamageBuff(Psionic)
- 2,25% Max End
- 4% Enhancement(Heal)
- 78% Enhancement(Accuracy)
- 111,3% Enhancement(RechargeTime)
- 56,2 HP (5,25%) HitPoints
- Knockback (Mag -8)
- Knockup (Mag -8)
- MezResist(Confused) 2,5%
- MezResist(Held) 2,5%
- MezResist(Immobilize) 7,45%
- MezResist(Sleep) 2,5%
- MezResist(Stun) 4,7%
- MezResist(Terrorized) 4,7%
- 26,5% (0,44 End/sec) Recovery
- 42% (1,88 HP/sec) Regeneration
- 14,2% Resistance(Fire)
- 14,2% Resistance(Cold)
Code:| Copy & Paste this data into Mids' Hero Designer to view the build | |-------------------------------------------------------------------| |MxDz;1429;718;1436;HEX;| |78DA9594594F534114C7E7D296D2BD802D65BF209496DA42A3228B912068A214690| |4F145251718689372215D708931C4C468145C9E54A2CF7E00356AFC501A7D74B99E| |6568223E79D3FE7F9D33E7CC9973666E676E4C7985D81E179A7FB260944A8B978D6| |22967AC48E7DC725E9ACB323851907A464ABD62EAB9CABA613A85109DFB5E8BB3AB| |ABD22CE5B764EAD2FA52D1282C9E8655CA1DD5F92979607EA25234EACF993959946| |639B5FFC39BDDD828A4CEE6CBA62C95DC3498DB947285ED19696CE6CD359F725ACB| |95612422B091387CEF4201FC5876F11CD0276A5E305E12EC7B8C57840ABA6BE4AE8| |930FC6817B511C216CC683C53A3F568E8EC8E314E81D16E13D7C1C3C61E0EDB708D| |1069513B42F08F32C608C1938C2E817040CB1C1C251C49327583C9A952391364AAF| |B0B617070A918574843D30348EEA19D5B0ECF6F4AE0B5183F086D3F09D15F847885| |1672C2423E55AEEF3C55D3B040EBDD84F502AA9800A7087B092D0142879F30E0667| |8080F21AA9EBBEDA88F52A68633848E3E468CD0152724FB0975B08B4695AB71874C| |8776198F09E12784C853C29167845B902BA4BA14E203E9E20349AB03B90D1E4DAA2| |74D59DA6064966B9826B465083D3A35233943A31D886A5637A6F904A5EA1F621CE7| |FCC718470977C0BD95DD45EB102616E2BE176F0C2FD1FE9616EF7BC778CFF840887| |F24EC827BA7EA5AE7175A55FFCAF8C6F8CE5D1BE76D4C12EE4154B78AEA4E93E9F0| |0023C948117A06196F28D73644F5724F6CBD692A38DA4B5D8B266814D769F408FC6| |2AA84D8349F5686303043485F60CC123438C284EA42822FA90D4C29754953FC0ED9| |C134A84C837CA9DAECD5F7133EF088CC3F96AC5DBD9360D1C8A2930F5561B98207F| |DE761D6A52C2EB258FFFD7CAAFE6FB82EBA41E751B2280B285750AEA25C43315096| |509651ACCFD5E8C0306E75046514650C25845BDE414FA707C483E245F1A1F851022| |8419446941694D728D61FD29EF743| |-------------------------------------------------------------------|
-
Put the data chunk please... It's annoying to download a file just to see a build.
Well I'd take one of the FF procs out of a power you won't be using so often (like Unchain Essence maybe, you already have so many FF procs) and put a common resist IO in Eclipse to cap your res with fewer mobs.
Since Black Dwarf Smite recharges so fast in your build even using crushing impacts, I'd consider moving the Hecatombs to your most damaging attack, Gravity Well.
But that's it, just minor tweaks I'd do and you may not agree, build looks great to me. -
Quote:First: most carnie psi attacks are the 'pink' ones (mental blast and the like) so they have ranged/aoe components you'll defend against. The one without positional tags are rarer (mesmerize, dominate, blind, I dunno how many of those carnies have).Originally Posted by Kheldarn
The Demon Farm, however, requires you to wade through 5 missions of Carnies, 1 Matla Mission, and 1 DE Mission, just to get it. Since it's one of the farms I want to pick up on my Rogue /SD Brute, I'm wondering how /SD handles the Psi from the Carnies. Will I be OK with just standard, Common IOs, or should I wait and slot up some sets first? Obviously, Sets will give me better odds, but if I can make it through the Carnies without any real issues, then I'll probably go ahead and do that, and slot IO sets later.
Second: turn your diff down. And use insps. I soloed a Carnie mish at 28 (before footstomp) at +1/x4/bosses on a SS/Fire with SOs (Fire has no psi resistance or def) because insps rain when you solo x3, x4... You can do -1/x4 just fine. Or -1/x1 for a cakewalk. I bet my 30 fm/sd scrapper can solo any carnie mish at 0/x4 because of the insps dropping like mad.
I know you want a /sd brute, but the demon farm on a SS/Fire would be laughably easy with 90% fire resist. -
Aspera: I just put this together in 10 minutes, it's softcapped to all and has good recovery plus 72.5% recharge, regen sucks tho (but the power order is much better than the previous build imo, I believe AAO and Rage should be taken asap - if you have ninja run to make up for the lack of travel powers till late):
Villain Plan by Mids' Villain Designer 1,703
http://www.cohplanner.com/
Click this DataLink to open the build!
Level 50 Magic Brute
Primary Power Set: Super Strength
Secondary Power Set: Shield Defense
Power Pool: Fitness
Power Pool: Leaping
Power Pool: Speed
Power Pool: Fighting
Ancillary Pool: Soul Mastery
Villain Profile:
Level 1: Punch -- T'Death-Acc/Dmg(A), T'Death-Dmg/EndRdx(3), T'Death-Dmg/Rchg(3), T'Death-Acc/Dmg/EndRdx(5), T'Death-Dmg/EndRdx/Rchg(5), T'Death-Dam%(7)
Level 1: Deflection -- LkGmblr-Def(A), LkGmblr-Rchg+(7), HO:Cyto(9)
Level 2: Haymaker -- Hectmb-Dmg/Rchg(A), Hectmb-Acc/Dmg/Rchg(23), Hectmb-Acc/Rchg(23), Hectmb-Dmg/EndRdx(25), Hectmb-Dam%(25)
Level 4: Battle Agility -- LkGmblr-Def/EndRdx(A), LkGmblr-Def/EndRdx/Rchg(9), LkGmblr-Def(11), LkGmblr-Rchg+(11)
Level 6: True Grit -- Numna-Heal/EndRdx(A), Numna-EndRdx/Rchg(13), Numna-Heal/Rchg(13), Numna-Heal/EndRdx/Rchg(15), Numna-Heal(15), Numna-Regen/Rcvry+(17)
Level 8: Knockout Blow -- C'ngImp-Acc/Dmg(A), C'ngImp-Dmg/Rchg(17), C'ngImp-Acc/Dmg/Rchg(19), C'ngImp-Acc/Dmg/EndRdx(19), C'ngImp-Dmg/EndRdx/Rchg(21), KinCrsh-Rechg/EndRdx(21)
Level 10: Active Defense -- HO:Membr(A)
Level 12: Hurdle -- Jump-I(A)
Level 14: Health -- Mrcl-Rcvry+(A)
Level 16: Against All Odds -- EndRdx-I(A)
Level 18: Rage -- GSFC-ToHit(A), GSFC-ToHit/Rchg(27), GSFC-ToHit/Rchg/EndRdx(27), GSFC-Rchg/EndRdx(29), GSFC-ToHit/EndRdx(29), GSFC-Build%(31)
Level 20: Stamina -- P'Shift-EndMod(A), P'Shift-EndMod/Rchg(31), P'Shift-EndMod/Acc/Rchg(31), P'Shift-Acc/Rchg(33), P'Shift-EndMod/Acc(33), P'Shift-End%(33)
Level 22: Phalanx Fighting -- LkGmblr-Rchg+(A)
Level 24: Combat Jumping -- LkGmblr-Rchg+(A), LkGmblr-Def(46)
Level 26: Hasten -- RechRdx-I(A), RechRdx-I(34), RechRdx-I(34)
Level 28: Boxing -- KntkC'bat-Knock%(A)
Level 30: Tough -- Aegis-ResDam/EndRdx(A), Aegis-ResDam/Rchg(34), Aegis-EndRdx/Rchg(36), Aegis-ResDam/EndRdx/Rchg(36), Aegis-ResDam(36), S'fstPrt-ResDam/Def+(37)
Level 32: Foot Stomp -- Oblit-Dmg(A), Oblit-Acc/Rchg(43), Oblit-Dmg/Rchg(45), Oblit-Acc/Dmg/EndRdx/Rchg(45), Oblit-Acc/Dmg/Rchg(45), Oblit-%Dam(46)
Level 35: Shield Charge -- Oblit-Dmg(A), Oblit-Acc/Rchg(37), Oblit-Dmg/Rchg(37), Oblit-Acc/Dmg/Rchg(40), Oblit-Acc/Dmg/EndRdx/Rchg(40), Oblit-%Dam(40)
Level 38: Weave -- LkGmblr-Def/EndRdx(A), LkGmblr-Rchg+(39), GftotA-Def/EndRdx(39), GftotA-Def(39)
Level 41: Gloom -- Thundr-Acc/Dmg(A), Thundr-Dmg/EndRdx(42), Thundr-Dmg/Rchg(42), Thundr-Acc/Dmg/Rchg(42), Thundr-Acc/Dmg/EndRdx(43), Thundr-Dmg/EndRdx/Rchg(43)
Level 44: Dark Obliteration -- Ragnrk-Dmg/Rchg(A), Ragnrk-Acc/Dmg/Rchg(46), Ragnrk-Acc/Rchg(48), Ragnrk-Dmg/EndRdx(50), Ragnrk-Knock%(50)
Level 47: Super Jump -- Zephyr-Travel(A), Zephyr-Travel/EndRdx(48), Zephyr-ResKB(48)
Level 49: Super Speed -- Zephyr-Travel(A), Zephyr-Travel/EndRdx(50)
------------
Level 1: Brawl -- Empty(A)
Level 1: Sprint -- Empty(A)
Level 2: Rest -- Empty(A)
Level 1: Fury
Level 6: Ninja Run
------------
Set Bonus Totals:- 13,5% DamageBuff(Smashing)
- 13,5% DamageBuff(Lethal)
- 13,5% DamageBuff(Fire)
- 13,5% DamageBuff(Cold)
- 13,5% DamageBuff(Energy)
- 13,5% DamageBuff(Negative)
- 13,5% DamageBuff(Toxic)
- 13,5% DamageBuff(Psionic)
- 9,88% Defense(Smashing)
- 9,88% Defense(Lethal)
- 11,4% Defense(Fire)
- 11,4% Defense(Cold)
- 11,1% Defense(Energy)
- 11,1% Defense(Negative)
- 3% Defense(Psionic)
- 16,8% Defense(Melee)
- 15,5% Defense(Ranged)
- 15,2% Defense(AoE)
- 72,5% Enhancement(RechargeTime)
- 6% Enhancement(Heal)
- 71% Enhancement(Accuracy)
- 14% FlySpeed
- 140,6 HP (9,38%) HitPoints
- 14% JumpHeight
- 14% JumpSpeed
- Knockback (Mag -4)
- Knockup (Mag -4)
- MezResist(Held) 6,05%
- MezResist(Immobilize) 4,95%
- MezResist(Stun) 4,4%
- 17% (0,28 End/sec) Recovery
- 52% (3,25 HP/sec) Regeneration
- 5,04% Resistance(Fire)
- 5,04% Resistance(Cold)
- 19% RunSpeed
- 2,5% XPDebtProtection
Code:| Copy & Paste this data into Mids' Hero Designer to view the build | |-------------------------------------------------------------------| |MxDz;1404;696;1392;HEX;| |78DA9D93594F534114C7E7B6B7946EB4584A5945D6B620950AB8E08389228986266| |0710920B596B16DD294A62D893E98F8017C727DC22DAE5F41BF816B7C55BF89CBF5| |9CF3BF3431BE79D3FE7F77CE3667E6CEA4AFCDFB95BA795C19BE93E55CBD9E3D51D| |B6E68573A5728E5955B29D523866C5A97B54E66B6ABBA96CD346ABA526814FBE09A| |D75775A54ECE624997377787EDA72B454D718DE4EE8B7F696BAB9C5C28352ABA5EC| |76051E7AAA54AC12B834C55EBCD801D542836C8113D552DE5939826B3B55DCEA673| |F586AE5DEFA2C612F41F3294FD582EB54A8829C71AB02E302F011B8296ACE01DAD5| |849A6E5501DF492522D1141EB2C194DA71A36EC00659946CCC1AECE389010748D03| |1382F754D089824E670895C2022FCA7B51FE03C5B910E7722D8BC97F16C808DA568| |07382D079C128A9DB5EA4FBB212CF15C19E3CB029E8D0C00DE9E923CDE54196F2CC| |61592D54C687F9952F2ED16E32056C53E08CC1DBF38932838621A6E0A044C568D42| |E3B62B9DA9F49FD9EE7C00B41DF4BE09560EF6B412BD50EDBCB0DDF86E70E7057B0| |EF1E701F7820F84CD347EC8E22D8B74E2A1485C988C234898D1D224F3756E9E89E9| |05E07FF824101BDF636F4AEF091514E32F5DB6DF54F4999C19460F820300DCC0846| |78E67E95201DB0BFC2C00FE974FCA760FF2FC0027E0B269593F1C5CF33226B08592| |3C81A41560CE13124C790655287A3F6791AC5791AC3B2C74CF94463AD823C45C7ED| |EAF11D596FE221F008782C187F023C1568CA9AB00FF7C434BA9D111C9815A40E018| |705516A26696F71F22BE2BE01DF05C314308500630A012904F499CDEB493F7AD4E2| |3F9625B379D594219605B3793D2D4F886E0CBCFFFBBCF1EF4EE959F6926658CEB15| |C60B9C8B2CAB2C6B2CEB2C19265B1DE36B38347B8AFA32C732CC75822D49FBAC591| |6E1F898FC5CF1260696309B28458C22C3D2C3B2CD61F37C9F796| |-------------------------------------------------------------------|
-
Lol sure give all squishies mez protection like Tankers... And before them, at level 6!
Worst suggestion ever. -
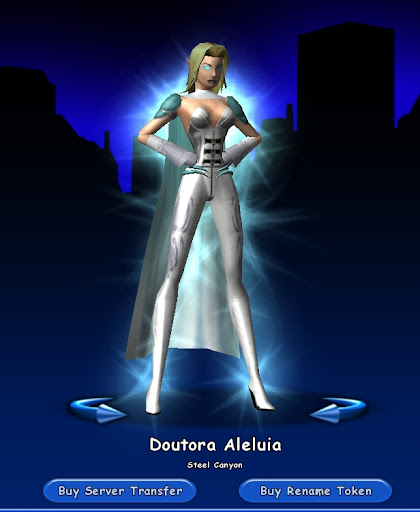
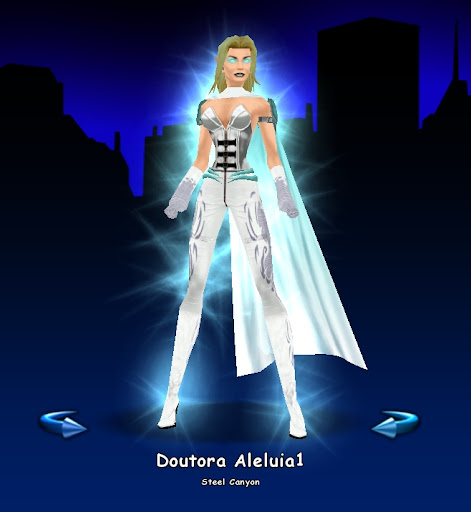
Ok a pic from just now on test (aniso x4, texture smooth, world detail 200%, char detail 200%, everything maxxed out, like particle detail, everything that was not greyed out), and below a pic from i16 with aniso off, texture crisp, char detail very high, world detail medium, particle medium.
EDIT: Oh I also have this really big pic with the gfx menu after the patch, I had forgotten to set particles but you can see that shader is still greyed out for me, the npc by my side has no shadows as her 'hot dog stand', as my toon and the fortunata .
TEST AFTER TODAY'S PATCH

I16

-
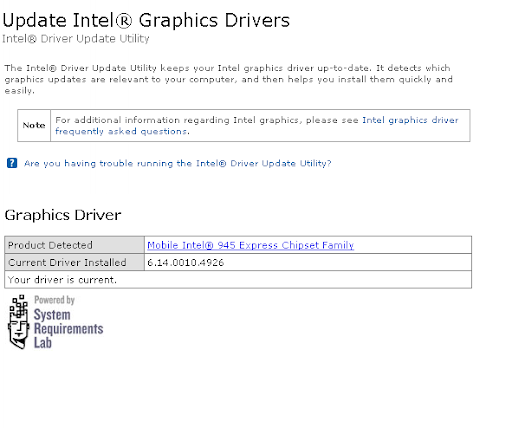
Yup Tex, I tested it after the patch, the shader option is still greyed out (till i16 I could go as far as low with bumpmaps iirc), as well as shadows, Intel's site utility says I have the most recent driver for my card (posted this pic in another thread).
-
Quote:Oh yeah this topic's gonna be long.Originally Posted by ryancowboy6
DireAngelus! exactamondo!!!!! want ripped off respec ur crafted junk!!!!
-
Sky_Hawke, where did you find drivers for your Intel chipset?
The Intel driver utility at http://www.intel.com/support/graphics/detect.htm says my driver's up to date.
But I have no shader options on Test yet, my game still looks like rubbish...
-
Quote:Well I play since i9 and the game worked just fine on my Intel GMA 950... Until i17.Originally Posted by Zloth
P.S. Intel graphics chips have been screwed since Issue 0. It's impressive that the game works on them at all.
Or do you think the game looks hella ugly here?
OTOH after i17....
-
Use the phpbb/zetaboards formatting so it appears normally. And post the data chunk please. It's annoying to have to download a file and have mid's open another instance automatically when clicking the link.
But on the build you posted before (not this last that I cannot see), I modified it. Removed all the excess bonuses getting better values in your toggles and restored your defenses to capped, s/l wasn't capped without E. Absorption in the builds 3 posts ago. Put a Kismet unique too in CJ, always a great little IO to have.
Hero Plan by Mids' Hero Designer 1,703
http://www.cohplanner.com/
Click this DataLink to open the build!
Level 50 Mutation Tanker
Primary Power Set: Ice Armor
Secondary Power Set: Ice Melee
Power Pool: Speed
Power Pool: Fitness
Power Pool: Leaping
Power Pool: Fighting
Ancillary Pool: Pyre Mastery
Hero Profile:
Level 1: Frozen Armor -- LkGmblr-Rchg+(A), LkGmblr-Def/EndRdx(11), GftotA-Def/EndRdx(11), GftotA-Run+(15)
Level 1: Frozen Fists -- KntkC'bat-Acc/Dmg(A), KntkC'bat-Dmg/EndRdx(3), KntkC'bat-Dmg/Rchg(3), KntkC'bat-Dmg/EndRdx/Rchg(7), C'ngImp-Acc/Dmg(9)
Level 2: Hoarfrost -- Dct'dW-Heal(A), Dct'dW-Heal/Rchg(13), Dct'dW-Rchg(13), Dct'dW-Heal/EndRdx/Rchg(15), Dct'dW-EndRdx/Rchg(21)
Level 4: Frost -- Posi-Acc/Dmg(A), Posi-Dmg/EndRdx(5), Posi-Dmg/Rchg(5), Posi-Dmg/Rng(7), Posi-Acc/Dmg/EndRdx(9), Range-I(34)
Level 6: Wet Ice -- EndRdx-I(A)
Level 8: Chilling Embrace -- TmpRdns-Acc/EndRdx(A), TmpRdns-EndRdx/Rchg/Slow(17), TmpRdns-Rng/Slow(40)
Level 10: Hasten -- RechRdx-I(A), RechRdx-I(50), RechRdx-I(50)
Level 12: Hurdle -- Jump-I(A)
Level 14: Combat Jumping -- LkGmblr-Rchg+(A), LkGmblr-Def(23), Ksmt-ToHit+(23)
Level 16: Icicles -- Erad-Acc/Dmg/Rchg(A), Erad-Dmg/Rchg(17), Erad-Acc/Dmg/EndRdx/Rchg(33), Erad-Dmg(42), M'Strk-Acc/Dmg/EndRdx(46), EndRdx-I(46)
Level 18: Health -- Numna-Regen/Rcvry+(A), Mrcl-Rcvry+(19), RgnTis-Regen+(19)
Level 20: Stamina -- Efficacy-EndMod(A), Efficacy-EndMod/Rchg(21), Efficacy-EndMod/Acc/Rchg(25), Efficacy-Acc/Rchg(25), Efficacy-EndMod/Acc(31), Efficacy-EndMod/EndRdx(33)
Level 22: Ice Patch -- RechRdx-I(A)
Level 24: Glacial Armor -- LkGmblr-Rchg+(A), LkGmblr-Def(27), GftotA-Def/EndRdx(29), GftotA-Def/EndRdx/Rchg(29)
Level 26: Energy Absorption -- LkGmblr-Rchg+(A), LkGmblr-Def(27), LkGmblr-Def/Rchg(31), P'Shift-EndMod/Rchg(31), P'Shift-EndMod/Acc/Rchg(34), P'Shift-Acc/Rchg(34)
Level 28: Freezing Touch -- C'ngImp-Dmg/EndRdx(A), Lock-%Hold(33), C'ngImp-Dmg/Rchg(36), C'ngImp-Acc/Dmg/Rchg(36), C'ngImp-Dmg/EndRdx/Rchg(36), C'ngImp-Acc/Dmg/EndRdx(37)
Level 30: Boxing -- Dsrnt-I(A)
Level 32: Tough -- S'fstPrt-ResDam/Def+(A), RctvArm-ResDam/EndRdx(37), RctvArm-ResDam(37), RctvArm-EndRdx(39), RctvArm-ResDam/EndRdx/Rchg(39)
Level 35: Weave -- GftotA-Def/EndRdx(A), GftotA-Def/EndRdx/Rchg(39), RedFtn-Def/EndRdx(40), LkGmblr-Rchg+(40)
Level 38: Frozen Aura -- Oblit-Dmg(A), Oblit-Acc/Rchg(42), Oblit-Dmg/Rchg(42), Oblit-Acc/Dmg/Rchg(43), Oblit-Acc/Dmg/EndRdx/Rchg(43), EndRdx-I(43)
Level 41: Char -- Lock-%Hold(A)
Level 44: Fire Blast -- Decim-Acc/Dmg(A), Decim-Dmg/EndRdx(45), Decim-Dmg/Rchg(45), Decim-Acc/EndRdx/Rchg(45), Decim-Acc/Dmg/Rchg(46)
Level 47: Fire Ball -- Posi-Acc/Dmg(A), Posi-Dmg/EndRdx(48), Posi-Dmg/Rchg(48), Posi-Dmg/Rng(48), Posi-Acc/Dmg/EndRdx(50)
Level 49: Hibernate -- RechRdx-I(A)
------------
Level 1: Brawl -- Empty(A)
Level 1: Sprint -- Jump-I(A)
Level 2: Rest -- Empty(A)
Level 1: Gauntlet
Level 6: Ninja Run
------------
Set Bonus Totals:- 5,5% DamageBuff(Smashing)
- 5,5% DamageBuff(Lethal)
- 5,5% DamageBuff(Fire)
- 5,5% DamageBuff(Cold)
- 5,5% DamageBuff(Energy)
- 5,5% DamageBuff(Negative)
- 5,5% DamageBuff(Toxic)
- 5,5% DamageBuff(Psionic)
- 8% Defense(Smashing)
- 8% Defense(Lethal)
- 3% Defense(Fire)
- 3% Defense(Cold)
- 7,38% Defense(Energy)
- 7,38% Defense(Negative)
- 3% Defense(Psionic)
- 5,5% Defense(Melee)
- 5,19% Defense(Ranged)
- 3% Defense(AoE)
- 4,05% Max End
- 4% Enhancement(Heal)
- 76,3% Enhancement(RechargeTime)
- 34% Enhancement(Accuracy)
- 1,5% Enhancement(JumpHeight)
- 1,5% Enhancement(FlySpeed)
- 1,5% Enhancement(RunSpeed)
- 1,5% Enhancement(JumpSpeed)
- 5% FlySpeed
- 189,7 HP (10,1%) HitPoints
- 5% JumpHeight
- 5% JumpSpeed
- MezResist(Immobilize) 8,8%
- MezResist(Stun) 2,2%
- MezResist(Terrorized) 2,2%
- 14% (0,23 End/sec) Recovery
- 50% (3,91 HP/sec) Regeneration
- 4,41% Resistance(Fire)
- 4,41% Resistance(Cold)
- 12,5% RunSpeed
Code:| Copy & Paste this data into Mids' Hero Designer to view the build | |-------------------------------------------------------------------| |MxDz;1393;713;1426;HEX;| |78DA9D94D94E135118C7CFB453A6CB7403CA5AE842590A52E0CE25D118D10443B50| |2E14AC5A11CA1B14E9B764CE4CE07C02D6ADCE203A8976E313E814A5CEED43730EA| |0BA858BFE594C8AD93CEFF77E69B6FBEE52CCD5F9C3685B8744068E6A1B255AF2F2| |D58F63959F3E62F389653AAD8C2104274B171695A9E95765DE6668A72E960ED7CA5| |D6A15EE46559B29946D1197B4DD6A4EDE49A037FA15229E7E6AB52AE98343C52726| |C59AFF3C3ACB4AA257B35A8DEACAE39F0143D5C2D157385F51A04B5EA8EACAD7741| |2959B85FFB4034B845C32D62309812FE0843070C8B908FD0E317EA6AE8A200480BD| |709C61CA1659EE03D23F0E3371056E3B0BA769CE299794681103A46689F25C421BA| |9BA37BDC4F2882FE94F18CD0F29CE07D41488D123621898793084F8A4C6FC164B0C| |9653CA4D891C784E1478434AC818F33B97C63F4CDD40EB4804340050D8C90A9034C| |411534C873D4D1CED802639F780711C3ECE0097F77A129F28D90FC41C87E258C3B1| |46F9C6B35206C54858D2E52BCD6A334D9ADFB3574F782439B0ADBB6E1A2F9BA4CE8| |BAC2B84AE8BF46485E2724602E63DCA188714FEFA1BE4EB5C89DDC400F3710E7458| |E1B840FE0D72D744AD8BDC3AF3FCAB84129523719B7382F24EC558BD76B51C2E44F| |7A33B04C4F034586246456089A812D72997D9364728329A1364DA293A620D34F856| |5D284A101468AA0837B5A7595E63E86B88F613F2F39B79086FA06557D83BFA8B0EC| |6FC61661F40FA3C1E0D5F904FB7144D537C2ED7C06D3983A0363B70566DA7587719| |7718F307E9FF005DC73CA3DC79B7A8237F5046FEA09DED453BCA93FC2E44FAA8493| |BC6E717DFBD0C10F2E31FBAF857767415707184C1A3965F5ED33DDF045E08CF0DBF| |FBD5E9ACD70BE39FC17584029A02CA29C443905A29DC69185A36594223E365E99CD| |8AC3BBB1AE3D287B51F6A1C4A03EB1819E4600248062A2045142286194084A1B4A0| |FCA0394C65F59C1F234| |-------------------------------------------------------------------|