Quote:
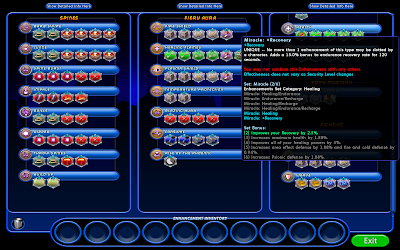
Rising Pheonix is part of a spines fire attack chain. You are going to need it. Fire Armor is weak on taking damage. So, you need to pick up your self rez.|
This is my build for my spines/fire scrapper. Am I doing something wrong......... Im fighting +1x5 and Im droping like Im naked in rush hour traffic. Suggestions would be greatly appreciated |
Give me a minute to bring up my own spines / fire to take a screen-cap.
***
Pictures being uploaded to here: http://picasaweb.google.com/je.saist/FireScrapper#


***
Okay, the key to any resist-based set, be it dark, fire, or elec, isn't defense. The reason being you have no resistance to defense debuff, and as a scrapper, tank, or brute, you are going to be in mob melee, not picking off your targets from a distance. Yes, you can soft cap your defense, but as I commented in an earlier thread: http://boards.cityofheroes.com/showthread.php?t=197779 :: when I did this on my own Fire Tank, the results were... horrible. In an average fight defense was often reduced to 0 and I was relying on my resists and recharge on healing flames... So get rid of maneuvers. It does you no good. Also, drop burn.
My own set here is actually due for a rework to account for the new Physical Perfection Power. I used a couple of Slow IO's in the spines set to gain a recovery boost, but I can drop them, put another slot into crushing impact, and gain more recharge. On paper, Physical Perfection should more than make up for the loss of the slow IO's in the Eden and Sewer Trials, and on Numina's task force, if I take it at 44.
I do, however, need to drop a power to free up room to take Physical Perfection. Which in my case is probably going to be Barb Swipe. I can put the Crushing Impact IO's on Brawl (or at least I think I can) so I'll still get the io buffs, and on paper, brawl should make the DPA of Barb Swipe... But there's a difference between working on paper, and working in the game.
Also, my build here has 4 kb IO's. This allows my scrapper to stand up against Mary in KTF and Loony the Mad in Faathim. You can really get away with less KB protection if you don't run any sort of task forces.
Plasma Shield: kb IO :: resist / endurance
Fire Shield: kb IO :: resist / endurance
Temperature Protection :: kb IO :: resist / defense
Tough :: kb IO :: resist / endurance
***
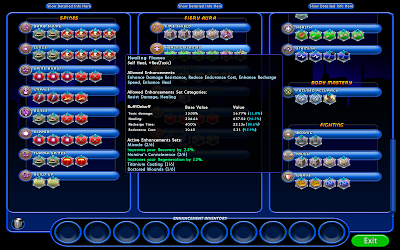
To my mind, way too much focus on some really strange slotting choices. You've got an awesome self-heal, with only half its enhancement towards recharge. Why? The set bonuses for +HP and +Regen you're getting there aren't worth it. Your shields (at least fire shield) aren't even slotted for resistance, and you've got... Maneuvers? o.O I don't even understand much of this build. Is there a specific goal you're going for? This is probably how I'd build a Spines/Fire, though keep in mind I've not made a Fire Armor char before.
It's got lower global recharge/+hp/regen, but better defenses by a fairly large margin and better resistances, though not by quite so much. With Hasten up Healing Flames is on a 14 second timer, 19 seconds without it. It's also got lower Recovery by a small margin (3.05 vs 3.2), but with Consume it's not so big a deal.
I dunno how you feel about purples, but I threw the Chance for Knockdown into Throw Spines. With this build it's up every 5.78 seconds with Hasten or 8.71 without (as opposed to every 8.81 from your build), and the knockdown chance is -very- noticeable. I use it in my Spines/Dark and having a hugely wide cone to lead with that has a chance to knock the targets down while I get into position for spine burst and the like is -really useful-. It doesn't always fire, but it happens enough that I know it contributes to my survival.
The one really big change, and this may be a gamebreaker for you, is that I dropped Burn. You've got Immob protection in Combat Jumping (which you should have on for the +defense anyway), and without an Immobilize it's not a very effective power for a Spines primary character because 99% of the time you want the enemies in close. They try to run off a bit enough with Quills (and I assume Blazing Aura, since Death Shroud does as well) as it is, Burn just seems like it'd make things even worse.
Anyway... not sure if this is anything like useful to you, but it seems like if you aren't able to even handle a +1/x5 atm, what have you got to lose? 
Hero Plan by Mids' Hero Designer 1.601
http://www.cohplanner.com/
Click this DataLink to open the build!
Experi-Moe: Level 50 Technology Scrapper
Primary Power Set: Spines
Secondary Power Set: Fiery Aura
Power Pool: Fitness
Power Pool: Speed
Power Pool: Leaping
Power Pool: Fighting
Ancillary Pool: Blaze Mastery
Hero Profile:
Level 1: Lunge -- KntkC'bat-Acc/Dmg(A), KntkC'bat-Dmg/Rchg(42), KntkC'bat-Dmg/EndRdx/Rchg(42), KntkC'bat-Dmg/EndRdx(43)
Level 1: Fire Shield -- RctvArm-ResDam(A), RctvArm-ResDam/EndRdx(3), RctvArm-ResDam/EndRdx/Rchg(3), RctvArm-ResDam/Rchg(36), RctvArm-EndRdx(36)
Level 2: Blazing Aura -- Sciroc-Acc/Dmg(A), Sciroc-Dmg/EndRdx(5), Sciroc-Dmg/Rchg(5), Sciroc-Acc/Rchg(37), Sciroc-Acc/Dmg/EndRdx(37)
Level 4: Healing Flames -- Numna-Heal/EndRdx/Rchg(A), Dct'dW-Heal/EndRdx/Rchg(7), Mrcl-Heal/EndRdx/Rchg(7), H'zdH-Heal/EndRdx/Rchg(11), RgnTis-Heal/EndRdx/Rchg(11), S'fstPrt-ResDam/Def+(31)
Level 6: Spine Burst -- Oblit-Dmg(A), Oblit-Acc/Rchg(9), Oblit-Dmg/Rchg(9), Oblit-%Dam(13), Oblit-Acc/Dmg/Rchg(31), Oblit-Acc/Dmg/EndRdx/Rchg(31)
Level 8: Swift -- Run-I(A)
Level 10: Hasten -- RechRdx-I(A), RechRdx-I(13), RechRdx-I(50)
Level 12: Combat Jumping -- Zephyr-Travel(A), Zephyr-Travel/EndRdx(15), Zephyr-ResKB(15)
Level 14: Super Jump -- Zephyr-Travel(A), Zephyr-Travel/EndRdx(19), Zephyr-ResKB(39)
Level 16: Plasma Shield -- RctvArm-ResDam/EndRdx(A), RctvArm-ResDam(17), RctvArm-ResDam/Rchg(17), RctvArm-ResDam/EndRdx/Rchg(40), RctvArm-EndRdx(40)
Level 18: Health -- Numna-Regen/Rcvry+(A), Mrcl-Rcvry+(19), RgnTis-Regen+(43)
Level 20: Stamina -- P'Shift-End%(A), P'Shift-EndMod(21), P'Shift-EndMod/Rchg(21), P'Shift-EndMod/Acc(34)
Level 22: Consume -- P'Shift-EndMod/Acc/Rchg(A), Efficacy-EndMod/Acc/Rchg(23), Efficacy-EndMod/Rchg(23), P'Shift-EndMod/Rchg(37)
Level 24: Impale -- Thundr-Acc/Dmg(A), Thundr-Acc/Dmg/Rchg(25), Thundr-Dmg/Rchg(25), Thundr-Dmg/EndRdx/Rchg(43)
Level 26: Quills -- Sciroc-Acc/Dmg/EndRdx(A), M'Strk-Acc/Dmg/EndRdx(27), Sciroc-Acc/Dmg(27), M'Strk-Acc/Dmg(40)
Level 28: Ripper -- Oblit-Acc/Dmg/Rchg(A), Oblit-Acc/Dmg/EndRdx/Rchg(29), Oblit-Dmg(29), Oblit-Dmg/Rchg(42)
Level 30: Boxing -- Empty(A)
Level 32: Throw Spines -- Posi-Acc/Dmg(A), Posi-Dmg/EndRdx(33), Posi-Dmg/Rchg(33), Posi-Dmg/Rng(33), Posi-Acc/Dmg/EndRdx(34), Ragnrk-Knock%(34)
Level 35: Fiery Embrace -- RechRdx-I(A), RechRdx-I(36)
Level 38: Tough -- Aegis-ResDam/EndRdx(A), Aegis-ResDam(39), Aegis-ResDam/Rchg(39)
Level 41: Char -- Lock-%Hold(A), BasGaze-Acc/Rchg(46), BasGaze-Acc/Hold(48)
Level 44: Build Up -- GSFC-ToHit(A), GSFC-ToHit/Rchg(45), GSFC-ToHit/Rchg/EndRdx(45), GSFC-Rchg/EndRdx(45), GSFC-ToHit/EndRdx(46), GSFC-Build%(46)
Level 47: Weave -- LkGmblr-Def(A), LkGmblr-Def/EndRdx(48), LkGmblr-Rchg+(48)
Level 49: Melt Armor -- Achilles-ResDeb%(A), AnWeak-Acc/Rchg(50), ShldBrk-Acc/Rchg(50)
------------
Level 1: Brawl -- Empty(A)
Level 1: Sprint -- Empty(A)
Level 2: Rest -- Empty(A)
Level 1: Critical Hit
------------
Set Bonus Totals:
- 8.5% DamageBuff(Smashing)
- 8.5% DamageBuff(Lethal)
- 8.5% DamageBuff(Fire)
- 8.5% DamageBuff(Cold)
- 8.5% DamageBuff(Energy)
- 8.5% DamageBuff(Negative)
- 8.5% DamageBuff(Toxic)
- 8.5% DamageBuff(Psionic)
- 12.4% Defense(Smashing)
- 12.4% Defense(Lethal)
- 13.3% Defense(Fire)
- 13.3% Defense(Cold)
- 14.9% Defense(Energy)
- 14.9% Defense(Negative)
- 3% Defense(Psionic)
- 12.4% Defense(Melee)
- 15.5% Defense(Ranged)
- 18.9% Defense(AoE)
- 43% Enhancement(Accuracy)
- 18.8% Enhancement(RechargeTime)
- 15% FlySpeed
- 100.4 HP (7.5%) HitPoints
- 15% JumpHeight
- 15% JumpSpeed
- Knockback (Mag -8)
- Knockup (Mag -8)
- MezResist(Immobilize) 4.95%
- MezResist(Sleep) 1.65%
- MezResist(Stun) 4.4%
- 9.5% (0.16 End/sec) Recovery
- 30% (1.68 HP/sec) Regeneration
- 1.58% Resistance(Fire)
- 1.58% Resistance(Cold)
- 3.13% Resistance(Negative)
- 20% RunSpeed
Code:
| Copy & Paste this data into Mids' Hero Designer to view the build |
|-------------------------------------------------------------------|
|MxDz;1401;713;1426;HEX;|
|78DAA5934B4F135114C7EF745A07FAA08552CAB3B5E5510A52A812118D1A118C1A6|
|ACA23ACD466AC576832699B4E5160E50750176A74454002A86B5F31AEFC062E74A3|
|7E125FF53C2EDDB87402FF5FE7F47FCEB9734E27B336ED15E2EE59A1359DB74CDBC|
|E2DE42B66B92C2BEE45995F2996ACD2F2BA7B660D0285914C491A4288D081259791|
|9694A9B9D58265D95DF5E8B4BC258BB64C5D28C8CA7AEEDC6AC56CBE545C911559A|
|CA60E3E78B3A592058E6A51DAB69B6E16CA52DEE4F8AC34CB85E2B24F999657AA70|
|D732532EE4535396B9217319D3AE42F176384D12FEB7F05874D5749105C445729EB|
|140189A231C459F463EA788C3878470441831426F94D14B38662837D8B5DB80B470|
|DE61AC11FAD6191B8471B0EB6C77E98B1A860E5D615CA47AEE29C669408F888409D|
|B90E55259AE9F0EB437FC62FC2678B1685A44FED05DA446704196C14F228C116A1F|
|8750231772340E53C8CB4833DAC0E0E11C87E72B9569FAC6F84E0883C1A72AF8D8D|
|0C28601361C07835FCDCFCF830BF018033CB8048F31C1F333C0DEAC1A362FD1245A|
|2ED3374367E8D91BC01064831E7C4A2D5A1F321E11624F0813E00BD12A6A7AE8318|
|5DA1E30EE13FAD8BE03BEB0FA1D8437E9A1DBB7195B84A11DC22EF83A94AF8397D7|
|5965F09A1365C21EF8BA94AF8BE7DFCDF3EFE64D2579459A814FC3DBE8A9C125F62|
|112555B8DBEA262875F33DE30DE1262EF18135467D2C05F296569715E5A2F43876F|
|FAD528FBC7688603E38C340D76071637A87637F883AA8D7C71E0B1463F139E41856|
|175A2E15D321CD963EC339E73D60BC64B8213B252AA6FAA953A8D061821C22EF41D|
|537DC73E424E50A43F516A5AD7B16FB7B3FE6EC21FCE66F69F48D6597FD1844691A|
|8B3FEA6FED7F5DE7BD0AB71DE0DBA8892455942B98A720DE53A8A897203258F52FB|
|50CFF69FC0034DA29C443985720F4D8607C483E245F1A134A1F8510228419436944|
|E944D94DA5FD6D00696|
|-------------------------------------------------------------------|

Well, first, putting clothes on won't help you stay up in rush hour traffic.
Second, you've missed some chances to build in useful defense bonuses, and instead taken set bonuses that aren't as useful (fire resistance? psionic defense??).
Third, if you had Build Up, you'd kill stuff a LOT FASTER, which would help your survival as well as boost the rate at which you gain xp/inf/drops.
You need to decide what sort of defense you're building for. Your defense bonuses from IO sets are kinda all over the place, and the defense numbers they're giving you obviously aren't sufficient. You can't build for everything, but you can build for a couple things very effectively. I advise S/L/melee defense, and then try to cherrypick enemies that do mostly or entirely S/L damage.
Also Char and Melt Armor aren't doing much for you. Sure, Melt Armor helps you kill stuff a little faster, but as a spines/fire tearing through spawns, Melt Armor is kinda superfluous to begin with, and then the long recharge time means it can only be used once every 3 spawns or so. I think you'd get more utility from something like Physical Perfection.
Here's a revised build which has enough S/L/melee to let you faceroll most enemy factions. EDIT: it also has a much faster-charging heal.
Code:
| Copy & Paste this data into Mids' Hero Designer to view the build |
|-------------------------------------------------------------------|
|MxDz;1411;711;1422;HEX;|
|78DAA5535B6F126110FD161669B996B6147A037A2FADD0568DB69A68AAB54915945|
|E9F5482F4B39020109626F6CD1F502FF1C527A326DA3FA0F112FF897FC50BCECC59|
|488C8F6EE01C767666CE70E6DBECA3359F528FAF282370AD52B0ACFC76B151A8D77|
|5C3B3A38BA56AAD523B380A3EACE9C4FAC6ADD54CE2EAEE4666CDAD940AB7F3F259|
|5DD13ABD7958AE54ACE14E744D3FD0554BA7D7CBBA71945F3D6C14421BD5926EE86|
|A33DDFEE1CBD56A15CA6856B565E126A30BF572F520D8BED9D70DAB54AEFBEDCC83|
|52939E86AED7CBC5F4D5DAFE513E5BB09A2410A58992F47DCDA3C9D572AA1CD1B87|
|26C0A79B68402DB426738CF903C538DD38F19E59810326342BD71A1589468549DA5|
|7403E92EE38743A92565FE14EAFA2514504EA6E86FB94BB484CE519513C398CEDB0|
|6874EE54037857C19A19EAC908BD25D1051AE94E2D01B0AE11FB55C6EE87641D703|
|411FE487A03B07DD012AE9B61B7587A57788425E841C5E8452FD420B3D42114AF04|
|349F9BF4B1B378582A87106F730E90D71656017A597C59CF39417B2BD0CC1CB5E78|
|D90F2FC7E0E512BCECA2F43E7B94BE97A2D4FF027327E44FBFA584304631C2F3128|
|A810C7A12B1B71BC176A3D86E02DB4D60BB4ECA1BB4271AC40C43186C0483A5C630|
|51442632297DD89E6818AE8CC09518AC7AE7E634AC61146B18C31A26E0FF24FC9F8|
|1FF33D8CD05AA8ACB216B99F163543D41D553543D43FA73A165378F0E9171884C40|
|641222D3109986C8024456A86ACA366B0A2E4D83DED39359BBDF2CFA25D12F897EC|
|9BF0ECD1CFA9D50D5BC7D66E73F48A3D31F419F419F84525F84B6A9286D1F9B3474|
|4FE8182DC24D6311FB5DC27E47CCCECB491FBA54E69F48CEB4DF4B8A1812899B9D5|
|7F5BFAEAFBEB656F79687708721C7B0C77087E12EC33D8602C37D862243EB5BA73A|
|B8CC03AD305C64B8C470CC496E2F8197C1C7E067083004197A18FA18061886185E3|
|1B4FE002CDA0391|
|-------------------------------------------------------------------|
Chaos:
Maybe I'm missing something, but is there ANY -kb in that build? And no Impale?! o.O
Ahh, no. Hehehe. Ahem. I did forget about /FA's lack of -KB.
(My experience is with spines/elec and a high S/L/melee def build which runs quite happily at +2x8.)
I'll go back and edit the build to put in some -KB.
As for Impale, I think it's fine to skp. But that's just my opinion, and probably others would disagree.
EDIT: OK, now it has 8 points of -KB. Sadly it lost a couple points of S/L and melee defense. But it still should be high enough to make with the facerolling on most enemy groups.
I don't think I'd ever consider dropping Impale, especially given Quills' tendency to make enemies run. And again, Physical Perfection is sort of meh with Fire. Certainly not worth giving up Impale.
I wouldn't skip Impale. It's good to have as a ranged attack + immob and it's nice to have because of Spines lack of ST damage. As for builds, you can find mine in the other various Spines/Fire threads, probably a page back or so.
Squishy? Not really, I rarely die on my Spines/Fire now. I have about 35% melee defense in my build which helps out tremendously.
[U][URL="http://boards.cityofheroes.com/showthread.php?t=251594"][/URL][/U]
Here's my Spines/Fire build....handles +2x8 BM/Warrior with no issues. Myself and another Spines/WP often dual farm for drops or SG lowbies....no issues at all. This build is an absolute beast with a kin keeping me fed with Fulcrum Shift.
Edit: Also worth nothing, I was never a fan of [Burn] until I figured out how to properly use it. It does have extra damage when the mob has spines through the stomach slowing them down and making them stay in the patch, but it's really nice to drop below you in a panic moment when [HealingFlames] isn't up, and to keep the bosses away (and out of melee range...those arrows don't hurt near as badly as the axe to the head).
My normal attack chain is to enter a mob, BU+SB+Burn+Throw Spines (run out of mob for cone of course)+ Ripper cone whoever is left, and Impale the scraggler. I also use inspirations as they come, but I don't rely on them to have an effective farmer. The build was also very cheap ,by most forum standards, rounding out at about 300M. It's probably my favorite AoE toon at the moment.
Hero Plan by Mids' Hero Designer 1.601
http://www.cohplanner.com/
Level 50 Technology Scrapper
Primary Power Set: Spines
Secondary Power Set: Fiery Aura
Power Pool: Speed
Power Pool: Fitness
Power Pool: Fighting
Power Pool: Leaping
Ancillary Pool: Body Mastery
Hero Profile:
Level 1: Lunge -- T'Death-Acc/Dmg:40(A), T'Death-Dmg/EndRdx:40(3), T'Death-Dmg/Rchg:40(3), T'Death-Acc/Dmg/EndRdx:40(5), T'Death-Dmg/EndRdx/Rchg:40(5), T'Death-Dam%:40(7)
Level 1: Fire Shield -- TtmC'tng-ResDam/EndRdx:50(A), TtmC'tng-ResDam/Rchg:50(7), TtmC'tng-ResDam:50(9), S'fstPrt-ResDam/Def+:30(9)
Level 2: Spine Burst -- M'Strk-Acc/Dmg:50(A), M'Strk-Dmg/EndRdx:50(11), M'Strk-Dmg/Rchg:50(11), M'Strk-Acc/EndRdx:50(13), M'Strk-Acc/Dmg/EndRdx:50(13), M'Strk-Dmg/EndRdx/Rchg:50(15)
Level 4: Healing Flames -- Dct'dW-EndRdx/Rchg:50(A), Dct'dW-Heal/Rchg:50(15), Dct'dW-Heal/EndRdx/Rchg:50(17), Dct'dW-Heal:50(17), Dct'dW-Rchg:50(19)
Level 6: Build Up -- AdjTgt-ToHit:50(A), AdjTgt-ToHit/Rchg:50(19), AdjTgt-ToHit/EndRdx/Rchg:50(21), AdjTgt-EndRdx/Rchg:50(21), AdjTgt-Rchg:50(23)
Level 8: Impale -- Decim-Acc/Dmg:40(A), Decim-Dmg/EndRdx:40(23), Decim-Dmg/Rchg:40(25), Decim-Acc/EndRdx/Rchg:40(25), Decim-Acc/Dmg/Rchg:40(27)
Level 10: Hasten -- RechRdx-I:50(A), RechRdx-I:50(27), RechRdx-I:50(29)
Level 12: Hurdle -- Jump-I:50(A)
Level 14: Super Speed -- Zephyr-Travel:50(A), Zephyr-Travel/EndRdx:50(29)
Level 16: Plasma Shield -- TtmC'tng-ResDam/EndRdx:50(A), TtmC'tng-ResDam/Rchg:50(31), TtmC'tng-ResDam:50(31)
Level 18: Health -- Heal-I:50(A), Heal-I:50(31)
Level 20: Consume -- Efficacy-EndMod:50(A), Efficacy-EndMod/Rchg:50(33), Efficacy-EndMod/Acc/Rchg:50(33), Efficacy-Acc/Rchg:50(33), Efficacy-EndMod/Acc:50(34), Efficacy-EndMod/EndRdx:50(34)
Level 22: Stamina -- P'Shift-EndMod:50(A), P'Shift-EndMod/Rchg:50(34), P'Shift-End%:50(36)
Level 24: Quills -- M'Strk-Acc/Dmg:50(A), M'Strk-Dmg/EndRdx:50(36), M'Strk-Dmg/Rchg:50(36), M'Strk-Acc/EndRdx:50(37), M'Strk-Acc/Dmg/EndRdx:50(37), M'Strk-Dmg/EndRdx/Rchg:50(37)
Level 26: Ripper -- M'Strk-Acc/Dmg:50(A), M'Strk-Dmg/EndRdx:50(39), M'Strk-Dmg/Rchg:50(39), M'Strk-Acc/EndRdx:50(39), M'Strk-Acc/Dmg/EndRdx:50(40), M'Strk-Dmg/EndRdx/Rchg:50(40)
Level 28: Burn -- Erad-Acc/Rchg:30(A), Erad-Dmg/Rchg:30(40), Erad-Acc/Dmg/Rchg:30(42), Erad-Acc/Dmg/EndRdx/Rchg:30(42)
Level 30: Boxing -- Empty(A)
Level 32: Throw Spines -- Posi-Acc/Dmg:50(A), Posi-Dmg/EndRdx:50(42), Posi-Dmg/Rchg:50(43), Posi-Dmg/Rng:50(43), Posi-Acc/Dmg/EndRdx:50(43), Ragnrk-Knock%:50(50)
Level 35: Tough -- TtmC'tng-ResDam/EndRdx:50(A), TtmC'tng-ResDam/Rchg:50(45), TtmC'tng-ResDam:50(45)
Level 38: Weave -- RedFtn-Def/EndRdx:50(A), RedFtn-Def/Rchg:50(45), RedFtn-EndRdx/Rchg:50(46), RedFtn-Def/EndRdx/Rchg:50(46), RedFtn-Def:50(50), RedFtn-EndRdx:50(50)
Level 41: Conserve Power -- RechRdx-I:50(A)
Level 44: Physical Perfection -- P'Shift-EndMod:50(A), P'Shift-EndMod/Acc:50(46), P'Shift-End%:50(48)
Level 47: Combat Jumping -- Zephyr-Travel:50(A), Zephyr-Travel/EndRdx:50(48), Zephyr-ResKB:30(48)
Level 49: Rise of the Phoenix -- RechRdx-I:50(A)
------------
Level 1: Brawl -- Empty(A)
Level 1: Sprint -- Empty(A)
Level 2: Rest -- Empty(A)
Level 1: Critical Hit
Code:
| Copy & Paste this data into Mids' Hero Designer to view the build |
|-------------------------------------------------------------------|
|MxDz;1390;695;1390;HEX;|
|78DAA593D94E53511486F7E940A123152933555A2850388031827861542431A15A8|
|578A14053CB169A346DED2989DCF9003827E210051C7801A718DF447D028767A86B|
|ADFFB4375E7AD2FEDF3E7BFD6B0F6BEF93BA3DE757EACE696504CF15B2969559CC5|
|5B2E5B2AE7897746EA3582A94D6B7944729D55E0F6452BAA0B57979335F28583D8D|
|DE397D53172D6DCEE775652B7366B3920D5F286EE88A2E56CD7AC39B2E950AE6625|
|9EB35BF34E7F3D5A2B6AC80FDB2BE51CD17D7115AD0D932BD84CF97F339F36C696D|
|2B93CA5A551ABB93163342FF5D5E953C35B7BA464828C7756059E05A0156054D19C|
|131CE3224CBA946A931A59A92826613E820F4A93D8F6DA3D18DB2E288F7165011F8|
|2DA02A086E0A8E539613592EE7828C174C095A2F02970487D2827DB2BB6DBBFB954|
|322BB82C37BC0BE20F246F09AEC1EDBEED991ED449E0A3A9F01CF05DD2F0403E46D|
|81DDD19294F57503BD4013197CA885F20D4B578CBA02C83102DF64D6DEEF8213140|
|9C1EC08A170FD285C3F0AE721431806231C97D1FA81698AB449356BEEB66D19EDC8|
|5DE01E705F70F401F050D04C59EDF684ED8F10792C88ED08DE92A1030677078E288|
|6238AE188E238A2388E288E237A47595DF6C176216B085943C81A425602590964CD|
|50560FB29C3D3F1D7C4312BF0423BF813F02C3C38A92F6D5E85107D413B5E78BBE9|
|7C1463E08463F029F80CF82A969D99B93B206ECCD0FA0DA63A8F618AAED22C3A0BD|
|F9412F223EC1B81F0808A6824048B0489773D85EDE302EC1011D77D29E2989328F3|
|F114CA0CC119AC9B40D26AEC404AEC4C40FD9F32C1926ED4127ED0BE66A7C9BF4E3|
|322CFCD3937635BE3065484FD4D5F836FFEBF9E2AF8FD372C54BBAC4922631AE726|
|B996585659525CB7283A3396ED5BEFAEB2B0DCDF0824EB2CCB29C62D96693C747E2|
|63F1B30458822C219656963696084B37CB4B96DA5FFAE3FE3E|
|-------------------------------------------------------------------|
Quote:
I've found that Throw Spines and Ripper are more than adequate to keep foes from getting away, and that the godawfully slow single-target attack that is Impale is of limited utility in an AoE monster like spines/elec (or spines/fire).|
Originally Posted by Barbie_Ink

I don't think I'd ever consider dropping Impale, especially given Quills' tendency to make enemies run. And again, Physical Perfection is sort of meh with Fire. Certainly not worth giving up Impale.
|
I predicted upthread that some people would disagree though, which is fine.
I'm going to echo some of the other responses...
Build Up is great for killing things faster. I recommend you add it. I was slow to appreciate its benefits when I started playing because I was more interested in acquiring new attacks rather than improving my existing ones. I was a fool. When I finally took Build Up, my reaction was, "Oh baby, where have you been all my life?" Your offensive capability will increase exponentially.
I also agree that Burn is very useful. When you're surrounded and click Build Up -> Spine Burst -> Burn, you crank out incredible damage and the bad guys will be running from you. (those that live through it) Just make sure that you activate Spine Burst before Burn. Burn's fear component will send the bad guys running so they won't get the full damage from Spine Burst if they've left the AoE damage radius.
I've yet to combine Build Up with Fiery Embrace, so I'm not sure if the damage increases stack. Even if they don't, you can still use FE as a second "Build Up" to increase your damage output during the course of a fight.
I can't really comment on the defense/resistance issues because (a) I'm not knowledgeable about them and (b) my own play style is "the best defense is a good offense."
I can tell you, however, that toasted bad guys with holes in them don't put up much of a fight.
Quote:
I guess it's different play styles is all. But the reason I took it is because of that, Spines has loads of AoE, but crappy ST damage. It's also great for taking out runners or immoblizing them so they can't get any further away.|
Originally Posted by Chaos_String
I've found that Throw Spines and Ripper are more than adequate to keep foes from getting away, and that the godawfully slow single-target attack that is Impale is of limited utility in an AoE monster like spines/elec (or spines/fire).
I predicted upthread that some people would disagree though, which is fine. |
Also, Fiery Embrace does stack with buildup. The thing is how FE works is it only increases your damage for all attacks for the first 10 seconds. After that it only boosts fire damage for the rest of the duration. I certainly wouldn't skip either of them especially on such an offensive oriented toon.
[U][URL="http://boards.cityofheroes.com/showthread.php?t=251594"][/URL][/U]
Quote:
That's good to know. Thanks for clarifying.
|
Originally Posted by Fiery-Enforcer
Also, Fiery Embrace does stack with buildup. The thing is how FE works is it only increases your damage for all attacks for the first 10 seconds. After that it only boosts fire damage for the rest of the duration. I certainly wouldn't skip either of them especially on such an offensive oriented toon.
|
Quote:
Okay, I'm going to disagree with most of this post. Resistance sets DO gain quite a bit of survivability from defense. Everything gains a lot of survivability from defense. Sure, you lack DDR but that's not to say the defense wont still help you while youre being debuffed|
Originally Posted by je_saist
Rising Pheonix is part of a spines fire attack chain. You are going to need it. Fire Armor is weak on taking damage. So, you need to pick up your self rez.
Okay, the key to any resist-based set, be it dark, fire, or elec, isn't defense. The reason being you have no resistance to defense debuff, and as a scrapper, tank, or brute, you are going to be in mob melee, not picking off your targets from a distance. Yes, you can soft cap your defense, but as I commented in an earlier thread: http://boards.cityofheroes.com/showthread.php?t=197779 :: when I did this on my own Fire Tank, the results were... horrible. In an average fight defense was often reduced to 0 and I was relying on my resists and recharge on healing flames... So get rid of maneuvers. It does you no good. Also, drop burn. My own set here is actually due for a rework to account for the new Physical Perfection Power. I used a couple of Slow IO's in the spines set to gain a recovery boost, but I can drop them, put another slot into crushing impact, and gain more recharge. On paper, Physical Perfection should more than make up for the loss of the slow IO's in the Eden and Sewer Trials, and on Numina's task force, if I take it at 44. I do, however, need to drop a power to free up room to take Physical Perfection. Which in my case is probably going to be Barb Swipe. I can put the Crushing Impact IO's on Brawl (or at least I think I can) so I'll still get the io buffs, and on paper, brawl should make the DPA of Barb Swipe... But there's a difference between working on paper, and working in the game. Also, my build here has 4 kb IO's. This allows my scrapper to stand up against Mary in KTF and Loony the Mad in Faathim. You can really get away with less KB protection if you don't run any sort of task forces. Plasma Shield: kb IO :: resist / endurance Fire Shield: kb IO :: resist / endurance Temperature Protection :: kb IO :: resist / defense Tough :: kb IO :: resist / endurance *** |
Lets say that you are fighting a spawn of even level CoT. Now, lets say you have softcapped melee defense (we won't worry about ranged and AoE for the time being), and a ruin mage hits you with a meaty 45% defense debuff. All of a sudden you went from taking 5% of incoming melee attack to being hit by 50% of melee attacks. That really sucks and decreases your survivability by a ton. However, if you did NOT have that 45% beginning defense, you would be getting hit by 95% of incoming attacks-- after the debuff that is. So, even if you are under a 45% defense debuff, you are still cutting the incoming damage in half.
And if there isn't a defense debuffer in the mob? Let's just say that your health bar will not be moving much.
"Also, drop burn."
I am a big proponent of burn. I think most either love or hate it. I personally love it because it deals a buttload of damage if the bad guy is incapacitated and cannot move. If you are soloing a lot, probably not worth the power pick, but if you team a lot (specifically with controllers), it's a great power to have.
"Fire Armor is weak on taking damage. So, you need to pick up your self rez."
My fire tank hasn't died in quite some time and I generally run solo on +2x8. I realize tanks are a different story than scrappers, but I'm just pointing out that fire doesn't HAVE to be weak. Granted, the self rez is still a handy tool to have. Rise of the Phoenix, along with Burn, tend to be playstyle choices. Je_Saist, I simply have a problem with you taking your personal preferences and presenting them as fact, and not even acknowledging that others may feel different.
I would say build defense in if you can. It makes you a lot more survivable. Here is my build as it is on live. Maybe it an help you get some ideas.
Hero Plan by Mids' Hero Designer 1.601
http://www.cohplanner.com/
Click this DataLink to open the build!
Shrapnel: Level 50 Mutation Scrapper
Primary Power Set: Spines
Secondary Power Set: Fiery Aura
Power Pool: Leaping
Power Pool: Fitness
Power Pool: Fighting
Power Pool: Speed
Hero Profile:
Level 1: Lunge -- T'Death-Acc/Dmg(A), T'Death-Dmg/EndRdx(3), T'Death-Dmg/Rchg(3), T'Death-Acc/Dmg/EndRdx(5), T'Death-Dmg/EndRdx/Rchg(5), T'Death-Dam%(7)
Level 1: Fire Shield -- RctvArm-ResDam/EndRdx(A), RctvArm-ResDam/Rchg(7), RctvArm-ResDam/EndRdx/Rchg(9), RctvArm-ResDam(9)
Level 2: Spine Burst -- Oblit-Dmg(A), Oblit-Acc/Rchg(11), Oblit-Dmg/Rchg(13), Oblit-Acc/Dmg/Rchg(13), Oblit-Acc/Dmg/EndRdx/Rchg(15), Oblit-%Dam(15)
Level 4: Healing Flames -- Dct'dW-Heal/EndRdx(A), Dct'dW-Heal/Rchg(17), Dct'dW-Heal/EndRdx/Rchg(19), Dct'dW-Rchg(19), Dct'dW-Heal(21), RechRdx-I(21)
Level 6: Combat Jumping -- Krma-ResKB(A)
Level 8: Impale -- Thundr-Acc/Dmg(A), Thundr-Dmg/EndRdx(11), Thundr-Dmg/Rchg(17), Thundr-Acc/Dmg/Rchg(23), Thundr-Dmg/EndRdx/Rchg(23), Thundr-Acc/Dmg/EndRdx(25)
Level 10: Swift -- Run-I(A)
Level 12: Super Jump -- Jump-I(A)
Level 14: Health -- Numna-Regen/Rcvry+(A), Mrcl-Rcvry+(25)
Level 16: Plasma Shield -- S'fstPrt-ResDam/Def+(A), ResDam-I(27), ResDam-I(27), EndRdx-I(29)
Level 18: Boxing -- Acc-I(A)
Level 20: Stamina -- EndMod-I(A), EndMod-I(29), EndMod-I(31), P'Shift-End%(31)
Level 22: Quills -- M'Strk-Acc/Dmg(A), M'Strk-Dmg/Rchg(31), M'Strk-Dmg/EndRdx(33), M'Strk-Acc/EndRdx(33), M'Strk-Dmg/EndRdx/Rchg(33), M'Strk-Acc/Dmg/EndRdx(34)
Level 24: Blazing Aura -- M'Strk-Dmg/Rchg(A), M'Strk-Dmg/EndRdx(34), M'Strk-Acc/Dmg(34), M'Strk-Acc/EndRdx(36), M'Strk-Dmg/EndRdx/Rchg(36), M'Strk-Acc/Dmg/EndRdx(36)
Level 26: Ripper -- Oblit-Dmg(A), Oblit-Acc/Rchg(37), Oblit-Dmg/Rchg(37), Oblit-Acc/Dmg/Rchg(37), Oblit-%Dam(39), Oblit-Acc/Dmg/EndRdx/Rchg(39)
Level 28: Tough -- RctvArm-ResDam/EndRdx(A), RctvArm-ResDam/Rchg(39), RctvArm-ResDam/EndRdx/Rchg(40), RctvArm-ResDam(40)
Level 30: Hasten -- RechRdx-I(A), RechRdx-I(40), RechRdx-I(42)
Level 32: Throw Spines -- Posi-Acc/Dmg(A), Posi-Dmg/EndRdx(42), Posi-Dmg/Rchg(42), Posi-Dmg/Rng(43), Posi-Acc/Dmg/EndRdx(43)
Level 35: Weave -- LkGmblr-Def/EndRdx(A), LkGmblr-Def/Rchg(45), LkGmblr-Def/EndRdx/Rchg(45), LkGmblr-Def(45)
Level 38: Consume -- Oblit-Acc/Dmg/EndRdx/Rchg(A), Oblit-Dmg(43), Oblit-Acc/Rchg(46), Oblit-Dmg/Rchg(46), Oblit-Acc/Dmg/Rchg(46), Oblit-%Dam(50)
Level 41: Build Up -- RechRdx-I(A)
Level 44: Fiery Embrace -- RechRdx-I(A)
Level 47: Burn -- Oblit-Dmg(A), Oblit-Acc/Rchg(48), Oblit-Dmg/Rchg(48), Oblit-Acc/Dmg/Rchg(48), Oblit-Acc/Dmg/EndRdx/Rchg(50), Oblit-%Dam(50)
Level 49: Rise of the Phoenix -- RechRdx-I(A)
------------
Level 1: Brawl -- Empty(A)
Level 1: Sprint -- Empty(A)
Level 2: Rest -- Empty(A)
Level 1: Critical Hit
------------
Set Bonus Totals:
- 14.5% DamageBuff(Smashing)
- 14.5% DamageBuff(Lethal)
- 14.5% DamageBuff(Fire)
- 14.5% DamageBuff(Cold)
- 14.5% DamageBuff(Energy)
- 14.5% DamageBuff(Negative)
- 14.5% DamageBuff(Toxic)
- 14.5% DamageBuff(Psionic)
- 16.8% Defense(Smashing)
- 16.8% Defense(Lethal)
- 4.88% Defense(Fire)
- 4.88% Defense(Cold)
- 9.25% Defense(Energy)
- 9.25% Defense(Negative)
- 3% Defense(Psionic)
- 26.8% Defense(Melee)
- 8% Defense(Ranged)
- 6.75% Defense(AoE)
- 4% Enhancement(Heal)
- 31.3% Enhancement(RechargeTime)
- 52% Enhancement(Accuracy)
- 4% FlySpeed
- 35.1 HP (2.62%) HitPoints
- 4% JumpHeight
- 4% JumpSpeed
- Knockback (Mag -4)
- Knockup (Mag -4)
- MezResist(Held) 2.75%
- MezResist(Immobilize) 4.95%
- MezResist(Sleep) 3.3%
- MezResist(Stun) 12.1%
- MezResist(Terrorized) 2.2%
- 4.5% (0.08 End/sec) Recovery
- 10% (0.56 HP/sec) Regeneration
- 4.73% Resistance(Fire)
- 4.73% Resistance(Cold)
- 4% RunSpeed
Code:
| Copy & Paste this data into Mids' Hero Designer to view the build |
|-------------------------------------------------------------------|
|MxDz;1397;681;1362;HEX;|
|78DAA593DB6E524114866717104AA180B4A5670A3DD013BBAD1A6DEB85516B13B52|
|85AD30B6D4BB6EDD89210403624F6CE07F0DEABDA43D417F014E38B9978C0B5D63F|
|25265EBA03FFC75EB3FEC5CCAC99DC8B9590522FAF29ABF366C971DDC2FA4ECDA95|
|6752D906BD49D7AB1520EACEF53A4AC4B7EA554F7D97021A74B5ADB0F1AC552C91D|
|684557F4335D76B5BD5AD4B583C2F546CD89DD2EEFEB9A2ED7EDB31FA17CA552B2D|
|7B4532D96F7F0B25AAC97B5EB86CDCBDE7E9D8682F2B65ED57A3776AB5ADCB16F54|
|760F0A39C7AD53ED5E9ACC147D8F7856F2347DEA3121A3DA9E009B02EF16B02D385|
|7105C6097252E8F1AB664242908A480B4E0D86FD2A8BAF5A34DA90515FC2908FD02|
|7E0B3A9B80F2302E91CB635C9EBB1687A239C1F97B405ED0751F98518C1E72F9302|
|7E5FB4E1852A714F29B42FE43C90ABE11448FE039064E05BD27021F59DA4DA1F6AC|
|841214EA4021D53129213F85C2C8B2C21B3291DE3BB2E8CB3412319B1349583C91F|
|E59D5C2821A4C092CCA8B99A2B17E0905281437D6F80892816183D7B2516F29AF1B|
|79BEEE2A466A8291E7800B3404A9BAE022B912C695407A0AE929D418856B14AE51B|
|8DE91ABCF6C621F7A38861E8EA18763E8E1049A3781567AC8356056328013328113|
|92C109C9E084A4FDBC3192D7368446668029E03D252491E04D7EC0C847E09360FA3|
|3F045E0A5F4B4F9DF7454DA321B03E24097E00AE58DCBD96CFAC631E5692C2E8BC5|
|65B1B82C16B780C59D906BD2B46C12F35BA2D08C09CD20B44821DBEC988DA273283|
|A87A273A668F3EFDACBE49A3785E65168D0DBBA9CF4A147ADFD13C97B5B574C5912|
|497A5B97F3BF9EAFA1B3FF6A7F18247DC49267D960D964D962D96671589EB2ECB03|
|4BFB5DC91459ED012CB32CB5596579CE4E73BD5C1126209B374B24458A22C71961E|
|967E964396E61F186AFEE6|
|-------------------------------------------------------------------|
The hard things I can do--- The impossible just take a little bit longer.
If numbers are so much more important than a teammate who is fun to play with, forget about the game altogether and go play with a calculator instead. -Claws and Effect-
Quote:
I totally get that. And I'm not saying that Impale is a bad power or a wrong pick.|
Originally Posted by Fiery-Enforcer
I guess it's different play styles is all. But the reason I took it is because of that, Spines has loads of AoE, but crappy ST damage. It's also great for taking out runners or immoblizing them so they can't get any further away.
|
But it's a slow-animating single-target attack in a build that's designed to spam AoE. Therefore it is questionable. Not a bad pick, necessarily, but open to interpretation.
The OP was citing problems surviving at +1x5. So I hastily edited his build to provide it with meaningful smashing, lethal, and melee defenses, along with a few other minor improvements. And I'm confident that the revised build will handle +2x8 against most enemy groups.
Just trying to be helpful, not stoke a controversy over Impale.
I have nothing against it. It's a staple power on my spines/regen stalker, but that's a completely different sort of toon.
Definitely chiming in that advice against building towards defense on a resist set is actively bad advice.
Does getting high defense mean you are going to be able to stand around and giggle at strong defense debuffers (of which Cimerorans are a shining example)? No, definitely not. Not even all defense sets are good at that, and enough of mobs like that will get to someone even softcapped if they don't have high DDR.
That said, in every other situation, layering defense on top of other mitigation tools is an excellent plan. In general, you want at least somewhere in the range 20% defense. If you can't get uniform defense coverage, then the general priority is melee, ranged, AoE (for positional) or Lethal/Smash, then whatever you are next most vulnerable to for damage typed.
If you have mitigation from resistance, that means only a certain amount of damage gets past your resistance. However, if you add on defense, only a certain amount of damage gets past that defense. These two layer - what gets past your defense only partially gets past your resistance. While not as strong as being able to drive either defense or resistance to their limits of 90% reduction, layering them is still very effective, at least if you can get to that 20% mark or so.
Some builds can benefit from a primary build focus on other bonuses, such as Regen being very, very happy with copious recharge. However, if you can swiing it, it is always worth layering defense on afterwards.
Fire is a hybrid set, with a strong, fast recharging heal and moderate resists, plus some oddball effects like Burn. Fire is very happy with strong recharge buffs, but it also really benefits from good +defense as well. Because of the strength of its self heal, +regen is not a particularly beneficial approach. Because of the weakness of most +resist bonuses, that's almost never a good approach.
There's a reason that so many people have high defense builds posted on the boards - it's very, very effective, and it's not "hard" to do on a wide array of powersets because +defense bonuses are common and in decently large sizes. Defense may not always be your best option, but it is always a good one, assuming the resources to attain it.
Blue
American Steele: 50 BS/Inv
Nightfall: 50 DDD
Sable Slayer: 50 DM/Rgn
Fortune's Shadow: 50 Dark/Psi
WinterStrike: 47 Ice/Dev
Quantum Well: 43 Inv/EM
Twilit Destiny: 43 MA/DA
Red
Shadowslip: 50 DDC
Final Rest: 50 MA/Rgn
Abyssal Frost: 50 Ice/Dark
Golden Ember: 50 SM/FA
First off, http://boards.cityofheroes.com/showt...=spines%2Ffire
That thread supplies good builds and good advice in exact response to your question (unlike this thread which has highly questionable advice, with perfectly reasonable advice sprinkled in just to make it more confusing.)
Slotting slows in attacks in unnecessary, it only decreases move speed, quills is the only power worth slotting a little slow in. *edit* it looks like, in a later post Je Saist said he was just getting recovery bonuses, so those slows are likely the end/rech of the slow sets.
Absolutely do not skip impale, I rarely dispute something directly, but not taking impale Would be a very bad choice because
A.) It allows you to give livable ST damage and gives you the capability to take down bosses
B.) It allows you to leverage burn, drastically increasing your single target DPS
C.) It is ranged, High damage, Immobilizing attack. (I mean, seriously)
It WILL gimp you if you don't take it.
-------------------------------------------------
I would assume there are some gameplay issues at hand as well, despite a little bit of odd slotting your build should be able to handle what you're fighting. My playstyle that has success (purely SO's) running 8/+1 runs a little like this
1.) Get a spawns attention using some sort of ranged attack or myself if I'm inspd up
2.) Drag said spawn around corner to pile them up
3.) Heal.
4.) BU+FE+Throw spines+Spine Burst, Burn
5.) Back off, heal, pick off stragglers, or repeat.
Start at 8/+0 instead of 5/+1 it'll cater to spines/fire better (number of targets doesn't matter, all dies in the opening salvo, it's what survives that's gonna cause you trouble) That'll also land you more inspirations, more xp, and more rewards in general faster.
You'll get the hang of living on inspirations and healing flames while delivering mind boggling AoE soon enough, then it's probably time to kick it up to 8/+1 until you're IO'd out.
"Fascinating. I'm not bored at all, I swear." -Kikuchiyo
Quote:
Totally agree with this. It's only a waste to build towards defense if you're doing it half-***** and don't get enough to be effective.
|
Originally Posted by UberGuy
Definitely chiming in that advice against building towards defense on a resist set is actively bad advice.
Does getting high defense mean you are going to be able to stand around and giggle at strong defense debuffers (of which Cimerorans are a shining example)? No, definitely not. Not even all defense sets are good at that, and enough of mobs like that will get to someone even softcapped if they don't have high DDR. That said, in every other situation, layering defense on top of other mitigation tools is an excellent plan. In general, you want at least somewhere in the range 20% defense. If you can't get uniform defense coverage, then the general priority is melee, ranged, AoE (for positional) or Lethal/Smash, then whatever you are next most vulnerable to for damage typed. If you have mitigation from resistance, that means only a certain amount of damage gets past your resistance. However, if you add on defense, only a certain amount of damage gets past that defense. These two layer - what gets past your defense only partially gets past your resistance. While not as strong as being able to drive either defense or resistance to their limits of 90% reduction, layering them is still very effective, at least if you can get to that 20% mark or so. Some builds can benefit from a primary build focus on other bonuses, such as Regen being very, very happy with copious recharge. However, if you can swiing it, it is always worth layering defense on afterwards. Fire is a hybrid set, with a strong, fast recharging heal and moderate resists, plus some oddball effects like Burn. Fire is very happy with strong recharge buffs, but it also really benefits from good +defense as well. Because of the strength of its self heal, +regen is not a particularly beneficial approach. Because of the weakness of most +resist bonuses, that's almost never a good approach. There's a reason that so many people have high defense builds posted on the boards - it's very, very effective, and it's not "hard" to do on a wide array of powersets because +defense bonuses are common and in decently large sizes. Defense may not always be your best option, but it is always a good one, assuming the resources to attain it. |
[U][URL="http://boards.cityofheroes.com/showthread.php?t=251594"][/URL][/U]
Quote:
Cool, I've been "directly disputed." How exciting. Taking these objections point-by-point,|
Originally Posted by Katten
Absolutely do not skip impale, I rarely dispute something directly, but not taking impale Would be a very bad choice because
A.) It allows you to give livable ST damage and gives you the capability to take down bosses B.) It allows you to leverage burn, drastically increasing your single target DPS C.) It is ranged, High damage, Immobilizing attack. (I mean, seriously) It WILL gimp you if you don't take it. |
A) Let's look at the DPA (damage per second, Arcanatime) of some Spines attacks.
1) Ripper: 2.585 damage scalar / 2.376sec Arcanatime = 1.08 DPA
2) Throw Spines: 1.5445 damage scalar / 1.848sec Arcanatime = 0.83 DPA
3) Impale: 2.122 damage scalar / 2.64sec Arcanatime = 0.80 DPA
4) Lunge: 1.37 damage scalar / 1.848sec Arcanatime = 0.74 DPA
OK, so Impale is a little better than Lunge for single-target damage per second. However, with a single damage proc in each, they'd wind up being about equal. With two damage procs in each, Lunge would pull ahead.
Regardless, to say that Impale is the set's saving grace for single-target damage and that without it, one lacks "the capability to take down bosses" is absurd. Impale has terrible single-target damage just like all the other attacks in the Spines powerset. Assuming you could chain something like (Ripper > Lunge > Throw Spines > Lunge) as I can, using Impale wouldn't improve your single-target damage by very much, if at all.
B) This point is well-taken. Since I play spines/elec and have no equivalent power to Burn, I won't dispute the validity of Impale as a means of immobilizing a target within the patch. (I would think that the slows in Quills, Throw Spines and Lunge, together with the knockdown and slow in Ripper, would be enough to leverage Burn against a single target, but I can't honestly confirm this.)
C) Maybe I should have been clearer in my explanation for why I didn't take Impale. So far, all this discussion has ignored the fact that I was building for S/L/Melee defense, and the fact that the only way to slot Impale to provide a S/L/melee set bonus is to four- or six-slot the power as a slow or immobilize. Slotting it as an attack won't get you any closer to high S/L/melee defense; and anything that doesn't get you closer to this goal pushes you farther from it.
Plainly put, the power Impale requires slots to be effective, and the slots I saved by not taking an attack that I really don't need bought me quite a few percentage points of defense in set bonuses elsewhere in the build.
You may go ahead and say that skipping Impale "WILL gimp you." But I can run at +2x8 against Malta, Carnies, Rikti, Praetorians, Council, etc., and do so at blistering speed. And on several occasions I've cleared most or all of a map before realizing that my inspiration tray isn't open. Frankly, nearly 40% S/L/melee defense is a lot more valuable than the ability to immobilize a single target, shoot a runner now and then, and do a couple more points of damage per second (or a couple less, depending on how you slot Lunge).
"It WILL gimp you if you don't take it?" I beg your pardon. It assuredly will not.
I just had a chance to mid's up your build Chaos, and I agree that defense is very important, since you're approaching the soft cap I can see why you might be straining to get that last bit of defense in. The global recharge seems to be allowing ripper to make it less painful to go without impale. It had sent alarm bells off since Pre-IO's I was incabable of imagining life with natural recharge without impale, since it is already painfully slow if the three attacks don't kill what i'm attacking.
As a personal preference I would take impale in use with FA in order to take advantage of the burn patch (unfortunately the slows are only enough to make it do about 1/4-1/3 damage to enemies surrounding you, not to use against a single target)
The only powers I can see you have that are slightly skippable are maneuvers, consume, impale, arguably physical perfection (since you have high global recharge, consume and conserve power)
Seems I'd been a bit hasty considering I hadn't checked out why you made the choice and that you'd on several occasions predicted someone would start a fuss over it like I did.
"Fascinating. I'm not bored at all, I swear." -Kikuchiyo
Quote:
Actually, that was the OP's build, hastily edited to show how it's possible to build in a focused way for strong defense to layer on top the other mitigation.|
Originally Posted by Katten
I just had a chance to mid's up your build Chaos, and I agree that defense is very important, since you're approaching the soft cap I can see why you might be straining to get that last bit of defense in. The global recharge seems to be allowing ripper to make it less painful to go without impale. It had sent alarm bells off since Pre-IO's I was incabable of imagining life with natural recharge without impale, since it is already painfully slow if the three attacks don't kill what i'm attacking.
As a personal preference I would take impale in use with FA in order to take advantage of the burn patch (unfortunately the slows are only enough to make it do about 1/4-1/3 damage to enemies surrounding you, not to use against a single target) The only powers I can see you have that are slightly skippable are maneuvers, consume, impale, arguably physical perfection (since you have high global recharge, consume and conserve power) Seems I'd been a bit hasty considering I hadn't checked out why you made the choice and that you'd on several occasions predicted someone would start a fuss over it like I did. |
My own personal spines/elec build is a bit better in every measurable way.

To be fair, I'd predicted people would disagree with skipping Impale because it's a unique and useful power among the scrapper sets, and having played a spines/regen stalker to 50, I was highly dubious of skipping it even as I planned out my spines/elec scrapper build.

It worked a treat, though, so perhaps I can credit myself for a modicum of out-of-box thinking.
Quote:
I definitely agree with skipping Impale, as with Throw Spines and even the potential of an Epic Mastery st ranged attack makes it pretty much obsolete.|
Originally Posted by Chaos_String
Actually, that was the OP's build, hastily edited to show how it's possible to build in a focused way for strong defense to layer on top the other mitigation.
My own personal spines/elec build is a bit better in every measurable way. To be fair, I'd predicted people would disagree with skipping Impale because it's a unique and useful power among the scrapper sets, and having played a spines/regen stalker to 50, I was highly dubious of skipping it even as I planned out my spines/elec scrapper build. It worked a treat, though, so perhaps I can credit myself for a modicum of out-of-box thinking. |
I went in a different direction than most with a kind of "moar damage please" build that opts out of Physical Perfection and even a travel power (ninja run has proven to be a sufficient replacement with level 50 Run IOs in Sprint and Swift, although I will miss the obligatory Slow Resist slot) for Blaze Mastery. Fire Blast is actually everything Spines/Fire wants and so much more, as it does more damage than Lunge and animates in a fraction of the time of Impale (although on the whole Impale would deal more damage if slotted, I feel Fire Blast was right to replace it). Seems kind of a noobish build with AoE's galore, probably even more than I need. I'll be sure to try it out for quite a while before I invest in the purple sets it needs but I can't see how Fireball could go wrong. FE, BU, SB, FB, Burn, maybe jump back and TS for the stragglers and finish off the rest with a still-boosted Fire Blast from FE.
Sets are mostly +Def for survival and some +Rech to make it more efficient for farming and putting Rise and Healing Flames on a shorter clock. My sets let me achieve a fairly impressive 29% Def for melee and 26% Def for S/L which is a huge survival boost for the build. These numbers will be increased to 32 and 29 respectively once I get the ever elusive TP protection/+3% Def Gladiator's Armor, which my PvP hours will hopefully lead me to.
Hero Plan by Mids' Hero Designer 1.601
http://www.cohplanner.com/
Click this DataLink to open the build!
Level 50 Science Scrapper
Primary Power Set: Spines
Secondary Power Set: Fiery Aura
Power Pool: Fitness
Power Pool: Fighting
Power Pool: Leaping
Ancillary Pool: Blaze Mastery
Hero Profile:
Level 1: Lunge
- (A) Kinetic Combat - Accuracy/Damage
- (3) Kinetic Combat - Damage/Endurance
- (11) Kinetic Combat - Damage/Recharge
- (15) Kinetic Combat - Damage/Endurance/Recharge
- (37) Mako's Bite - Accuracy/Damage/Endurance/Recharge
- (A) Reactive Armor - Resistance/Endurance
- (11) Reactive Armor - Resistance/Recharge
- (15) Reactive Armor - Resistance/Endurance/Recharge
- (36) Reactive Armor - Resistance
- (37) Reactive Armor - Endurance
- (37) Steadfast Protection - Resistance/+Def 3%
- (A) Armageddon - Damage
- (3) Armageddon - Damage/Recharge
- (7) Armageddon - Accuracy/Damage/Recharge
- (13) Armageddon - Accuracy/Recharge
- (13) Armageddon - Damage/Endurance
- (17) Fury of the Gladiator - Chance for Res Debuff
- (A) Doctored Wounds - Heal/Endurance
- (5) Doctored Wounds - Recharge
- (5) Doctored Wounds - Heal/Recharge
- (7) Doctored Wounds - Heal/Endurance/Recharge
- (9) Doctored Wounds - Heal
- (9) Doctored Wounds - Endurance/Recharge
- (A) Run Speed IO
- (A) Accuracy IO
- (A) Luck of the Gambler - Recharge Speed
- (43) Blessing of the Zephyr - Run Speed, Jump, Flight Speed, Range
- (43) Blessing of the Zephyr - Knockback Reduction (4 points)
- (A) Recharge Reduction IO
- (A) Numina's Convalescence - +Regeneration/+Recovery
- (A) Reactive Armor - Resistance/Endurance
- (17) Reactive Armor - Resistance/Recharge
- (36) Reactive Armor - Resistance/Endurance/Recharge
- (42) Reactive Armor - Resistance
- (42) Reactive Armor - Endurance
- (43) Gladiator's Armor - TP Protection +3% Def (All)
- (A) Reactive Armor - Resistance
- (19) Reactive Armor - Resistance/Endurance
- (19) Reactive Armor - Resistance/Endurance/Recharge
- (39) Reactive Armor - Resistance/Recharge
- (A) Performance Shifter - EndMod
- (21) Performance Shifter - EndMod/Accuracy
- (21) Performance Shifter - EndMod/Recharge
- (50) Performance Shifter - Chance for +End
- (A) Obliteration - Damage
- (23) Obliteration - Accuracy/Recharge
- (23) Obliteration - Damage/Recharge
- (34) Obliteration - Accuracy/Damage/Recharge
- (39) Obliteration - Accuracy/Damage/Endurance/Recharge
- (40) Obliteration - Chance for Smashing Damage
- (A) Obliteration - Damage
- (25) Obliteration - Accuracy/Recharge
- (25) Obliteration - Damage/Recharge
- (29) Obliteration - Accuracy/Damage/Recharge
- (40) Obliteration - Accuracy/Damage/Endurance/Recharge
- (40) Obliteration - Chance for Smashing Damage
- (A) Obliteration - Damage
- (27) Obliteration - Accuracy/Recharge
- (27) Obliteration - Damage/Recharge
- (29) Obliteration - Accuracy/Damage/Recharge
- (33) Obliteration - Accuracy/Damage/Endurance/Recharge
- (42) Obliteration - Chance for Smashing Damage
- (A) Recharge Reduction IO
- (A) Obliteration - Damage
- (31) Obliteration - Accuracy/Recharge
- (31) Obliteration - Damage/Recharge
- (31) Obliteration - Accuracy/Damage/Recharge
- (46) Obliteration - Accuracy/Damage/Endurance/Recharge
- (50) Obliteration - Chance for Smashing Damage
- (A) Positron's Blast - Accuracy/Damage
- (33) Positron's Blast - Damage/Endurance
- (33) Positron's Blast - Damage/Recharge
- (34) Positron's Blast - Damage/Range
- (34) Positron's Blast - Accuracy/Damage/Endurance
- (A) Luck of the Gambler - Defense
- (36) Luck of the Gambler - Defense/Endurance
- (39) Luck of the Gambler - Recharge Speed
- (46) Luck of the Gambler - Defense/Recharge
- (A) Recharge Reduction IO
- (A) Accuracy IO
- (A) Apocalypse - Damage
- (45) Apocalypse - Damage/Recharge
- (45) Apocalypse - Accuracy/Damage/Recharge
- (45) Apocalypse - Accuracy/Recharge
- (46) Apocalypse - Damage/Endurance
- (A) Ragnarok - Damage
- (48) Ragnarok - Damage/Recharge
- (48) Ragnarok - Accuracy/Damage/Recharge
- (48) Ragnarok - Accuracy/Recharge
- (50) Ragnarok - Damage/Endurance
- (A) Recharge Reduction IO
Level 1: Brawl
- (A) Empty
- (A) Empty
- (A) Empty
Face value other than the purples, the two LoTG unique enhancements, and the Numina's Unique, the build isn't as ridiculous as others I've seen, and I hope to have it ready once my Spines/Fire reaches 50 (or at least the means to get it when I reach 50) but the problem now is getting there from 34...
Hey all,
This is my build for my spines/fire scrapper. Am I doing something wrong.........
Im fighting +1x5 and Im droping like Im naked in rush hour traffic. Suggestions
would be greatly appreciated.
Hero Plan by Mids' Hero Designer 1.601
http://www.cohplanner.com/
Click this DataLink to open the build!
Level 50 Technology Scrapper
Primary Power Set: Spines
Secondary Power Set: Fiery Aura
Power Pool: Fitness
Power Pool: Leaping
Power Pool: Leadership
Power Pool: Fighting
Ancillary Pool: Blaze Mastery
Hero Profile:
Level 1: Lunge -- KntkC'bat-Acc/Dmg:35(A), KntkC'bat-Dmg/EndRdx:35(3), KntkC'bat-Dmg/Rchg:35(11), KntkC'bat-Dmg/EndRdx/Rchg:35(15)
Level 1: Fire Shield -- S'fstPrt-ResDam/EndRdx:30(A), S'fstPrt-ResDam/Def+:30(3), S'fstPrt-ResKB:30(5)
Level 2: Blazing Aura -- Sciroc-Acc/Dmg:50(A), Sciroc-Dmg/EndRdx:50(5), Sciroc-Dmg/Rchg:50(9), Sciroc-Acc/Rchg:50(25), Sciroc-Acc/Dmg/EndRdx:50(33), Sciroc-Dam%:50(34)
Level 4: Healing Flames -- Numna-Heal:50(A), Numna-Heal/Rchg:50(7), Numna-Heal/EndRdx:50(7), Mrcl-Heal:40(13), Mrcl-Heal/Rchg:40(17), Mrcl-Heal/EndRdx:40(19)
Level 6: Swift -- Run-I:50(A)
Level 8: Spine Burst -- Oblit-Dmg:50(A), Oblit-Acc/Rchg:50(9), Oblit-Dmg/Rchg:50(13), Oblit-Acc/Dmg/Rchg:50(27), Oblit-Acc/Dmg/EndRdx/Rchg:50(43), Oblit-%Dam:50(46)
Level 10: Combat Jumping -- LkGmblr-Def/EndRdx:50(A), LkGmblr-Rchg+:50(11)
Level 12: Maneuvers -- GftotA-Def:40(A), GftotA-Def/EndRdx:40(46), GftotA-Def/Rchg:40(48)
Level 14: Super Jump -- Zephyr-Travel:50(A), Zephyr-Travel/EndRdx:50(15)
Level 16: Health -- Numna-Regen/Rcvry+:50(A), Mrcl-Rcvry+:40(17), RgnTis-Regen+:30(48)
Level 18: Plasma Shield -- ImpArm-ResDam:40(A), ImpArm-ResDam/EndRdx:40(19), ImpArm-ResDam/Rchg:40(21)
Level 20: Stamina -- Efficacy-EndMod:50(A), Efficacy-EndMod/Rchg:50(21), Efficacy-EndMod/Acc/Rchg:50(23), Efficacy-EndMod/Acc:50(23), Efficacy-EndMod/EndRdx:50(25)
Level 22: Impale -- Dev'n-Acc/Dmg:50(A), Dev'n-Dmg/EndRdx:50(31), Dev'n-Dmg/Rchg:50(33), Dev'n-Acc/Dmg/Rchg:50(33)
Level 24: Boxing -- Empty(A)
Level 26: Tough -- ImpArm-ResDam:40(A), ImpArm-ResDam/EndRdx:40(27), ImpArm-ResDam/Rchg:40(29)
Level 28: Weave -- LkGmblr-Def:50(A), LkGmblr-Def/EndRdx:50(29), LkGmblr-Def/Rchg:50(31), LkGmblr-Rchg+:50(31)
Level 30: Quills -- Oblit-Dmg:50(A), Oblit-Acc/Rchg:50(34), Oblit-Dmg/Rchg:50(36), Oblit-Acc/Dmg/Rchg:50(37), Oblit-Acc/Dmg/EndRdx/Rchg:50(40), Oblit-%Dam:50(40)
Level 32: Consume -- Efficacy-EndMod:50(A), Efficacy-EndMod/Rchg:50(34), Efficacy-EndMod/Acc/Rchg:50(36), Efficacy-Acc/Rchg:50(37), Efficacy-EndMod/Acc:50(40), Efficacy-EndMod/EndRdx:50(48)
Level 35: Burn -- Sciroc-Acc/Dmg:50(A), Sciroc-Dmg/EndRdx:50(36), Sciroc-Dmg/Rchg:50(37), Sciroc-Acc/Dmg/EndRdx:50(39), Sciroc-Dam%:50(39)
Level 38: Fiery Embrace -- RechRdx-I:50(A), RechRdx-I:50(39)
Level 41: Ripper -- M'Strk-Acc/Dmg:50(A), M'Strk-Dmg/EndRdx:50(42), M'Strk-Dmg/Rchg:50(42), M'Strk-Acc/EndRdx:50(42), M'Strk-Acc/Dmg/EndRdx:50(43), M'Strk-Dmg/EndRdx/Rchg:50(43)
Level 44: Throw Spines -- Posi-Acc/Dmg:50(A), Posi-Dmg/EndRdx:50(45), Posi-Acc/Dmg/EndRdx:50(45), Posi-Dmg/Rng:50(45), Posi-Dam%:50(46)
Level 47: Char -- Dev'n-Hold%:50(A)
Level 49: Melt Armor -- AnWeak-DefDeb:50(A), AnWeak-Acc/DefDeb:50(50), AnWeak-DefDeb/EndRdx/Rchg:50(50), AnWeak-%ToHit:50(50)
------------
Level 1: Brawl -- Empty(A)
Level 1: Sprint -- Empty(A)
Level 2: Rest -- Empty(A)
Level 1: Critical Hit
------------
Set Bonus Totals:
| Copy & Paste this data into Mids' Hero Designer to view the build |
|-------------------------------------------------------------------|
|MxDz;1411;721;1442;HEX;|
|78DAA593594F135114C7EFB453074A57A00BFB56765B408D8 2261A103035C594F54|
|96DC67AA54DC6B6CE14057CF103E0F6018C0681F8AE418DDF 41637CD38FE2329E65|
|DA171F9DB4FFDFCCB9FF73EFB967EE2C6DCFFB84787449288 1CB866E59B9D5BCA95|
|72AD2F4AEC97CA15436CA9B3BC1BB65D9BB98BE369BE99D5B 4F67E6352144A4E6CB|
|2D4943CAD4F256D130AC8E7A745EDE91254BA6168BD2DCC9C D6E997A385D2A48539|
|6AAA9DA8D2F5B2E1BE0A896A465F14346EA95626933587BB8 2D4DAB50ACF81DE766|
|A10AA3CD0B95623E3567E8BB32B7A45B5558210E258DC2FF2 5D64697ED165940BF7|
|02D13BC2B84C02AE114FA14F2B944146EBA842B4650E384D3 9A332E6C8F721F3025|
|D40784866D427C87D0BB4BE87B483803596E27CBBDAE60E8C 42A6399E04B038645E|
|80AA17981E0812C0F17233C499AE81584346722EDA78BD6FD 45F0FD26B4FF218CD9|
|8424AE3A25A290D2C8594A638816F44608611869E21157530 3AD9A5409131E420C0|
|C7E27D5FF9D260DFC20683012745A15DCA0D9425739F522B5 EA2C18C28E213CC21B|
|4B105A07090D60686183DAB24793B63E26449F309E11E2CF0 9FB608F38EF30F29AD|
|AD17DC0CD3E641C1114F0C5D82762365CC20D9136A79236AE A49D2BE9E44A543074|
|B0C1DDD14A7BE9E43E758719DCAE030D37C6EDEFE2F6F771F B07B8FD096EFF30B77|
|F98DB7F0EB27AE8D4D89E1EDE671FEF7380F79978CA76DEEE 046F775AC303C9DDE9|
|E79336C0272DC1276D888FD8101FB119B00F3A2F6A709C471 8873032E2143D52A1D|
|0E83D86C9B0086355C616E108B2C69DE5C7DF52E8E43BC67B C63121F981B00F8724|
|E5343DF5864207109A749A3AF999F634F585F195F18DD0A9D 6BF4DF8E1FBCAFC13C|
|9AAF5CF4E2814E951EB5FEA7F5D1F7DB5B51A57BCA06B2859 940D94EB2837506EA2|
|E828B750F228F6A77A76701A0B9A41398F7201650F4D1A7E6 04D283E143F4A00258|
|81242694189A2B4A3BC40B1FF0235A006F7|
|-------------------------------------------------------------------|