
Cerulean_Shadow
-
Posts
218 -
Joined
-
Okay, I've been playing around with Mids, clicking the little green balls to turn powers on and off. When all of Fury Flechette's powers except Phalanx Fighting are on, s/he has a Melee defense of 31.3%, the same as Gentleman Gladiator. When I turn Phalanx Fighting on Fury, it jumps up to 45.4%, yet when it's turned on for GG it only jumps to 35%. Both toons are slotted identically in Phalanx Fighting, (LOTG: Defense, LOTG: Recharge Speed, and LOTG: Def/End) so I don't understand the difference.
-
No matter what I do, I can't reach 45%. The most I can manage is 35%. I copied Fury Flechette's build EXACTLY (minus the fact that fitness is now inherent and wasn't when he made that build, and I used the extra power slots that entailed for more powers) and I am stuck at 35%. I don't understand it.
Here is where I am at:
Hero Plan by Mids' Hero Designer 1.90
http://www.cohplanner.com/
Click this DataLink to open the build!
GG v2: Level 50 Magic Scrapper
Primary Power Set: Broad Sword
Secondary Power Set: Shield Defense
Power Pool: Teleportation
Power Pool: Flight
Power Pool: Fighting
Power Pool: Leaping
Ancillary Pool: Body Mastery
Hero Profile:
Level 1: Hack -- C'ngImp-Acc/Dmg(A), C'ngImp-Dmg/EndRdx/Rchg(3), C'ngImp-Dmg/Rchg(3), C'ngImp-Acc/Dmg/Rchg(5), C'ngImp-Acc/Dmg/EndRdx(5)
Level 1: Deflection -- GftotA-Def/EndRdx(A), GftotA-Def/EndRdx/Rchg(7), GftotA-Def(7), S'fstPrt-ResDam/Def+(9)
Level 2: Slice -- Oblit-Dmg(A), Oblit-Acc/Rchg(9), Oblit-Dmg/Rchg(11), Oblit-Acc/Dmg/Rchg(11), Oblit-Acc/Dmg/EndRdx/Rchg(13)
Level 4: Battle Agility -- GftotA-Def/EndRdx(A), GftotA-Def/Rchg(13), GftotA-Def/EndRdx/Rchg(15), GftotA-Def(15)
Level 6: True Grit -- ImpArm-ResDam/EndRdx(A), ImpArm-ResDam(17), Numna-Heal/EndRdx(17), Numna-Heal/Rchg(19), Numna-Heal(19)
Level 8: Parry -- LkGmblr-Def(A), LkGmblr-Rchg+(21), C'ngImp-Acc/Dmg(21), C'ngImp-Acc/Dmg/Rchg(23), C'ngImp-Acc/Dmg/EndRdx(23)
Level 10: Recall Friend -- RechRdx-I(A)
Level 12: Active Defense -- RechRdx-I(A), RechRdx-I(25)
Level 14: Build Up -- GSFC-ToHit(A), GSFC-ToHit/Rchg(25), GSFC-ToHit/Rchg/EndRdx(27), GSFC-Rchg/EndRdx(27), GSFC-ToHit/EndRdx(29), GSFC-Build%(29)
Level 16: Against All Odds -- EndRdx-I(A)
Level 18: Teleport -- Zephyr-Travel(A), Zephyr-Travel/EndRdx(31)
Level 20: Hover -- EndRdx-I(A)
Level 22: Whirling Sword -- Erad-Dmg(A), Erad-Acc/Dmg/Rchg(31), Erad-Acc/Dmg/EndRdx/Rchg(31), Sciroc-Dmg/EndRdx(33), Sciroc-Dmg/Rchg(33)
Level 24: Phalanx Fighting -- LkGmblr-Def/EndRdx(A), LkGmblr-Def(33), LkGmblr-Rchg+(34)
Level 26: Boxing -- Acc-I(A)
Level 28: Tough -- ImpArm-ResDam(A), ImpArm-ResDam/Rchg(34), ImpArm-ResDam/EndRdx(34)
Level 30: Disembowel -- C'ngImp-Acc/Dmg(A), C'ngImp-Acc/Dmg/Rchg(36), C'ngImp-Dmg/EndRdx(36), C'ngImp-Acc/Dmg/EndRdx(36), C'ngImp-Dmg/EndRdx/Rchg(37)
Level 32: Head Splitter -- Sciroc-Acc/Dmg(A), Sciroc-Dmg/EndRdx(37), Sciroc-Dmg/Rchg(37), Sciroc-Acc/Dmg/EndRdx(39), Sciroc-Acc/Rchg(39)
Level 35: Shield Charge -- Oblit-Dmg(A), Oblit-Acc/Rchg(40), Oblit-Dmg/Rchg(40), Oblit-Acc/Dmg/Rchg(40), Oblit-Acc/Dmg/EndRdx/Rchg(42), Oblit-%Dam(42)
Level 38: Weave -- LkGmblr-Rchg+(A), GftotA-Def/EndRdx(42), GftotA-Def/EndRdx/Rchg(43)
Level 41: Focused Accuracy -- EndRdx-I(A)
Level 44: Physical Perfection -- Mrcl-Rcvry+(A), Mrcl-Heal(45), P'Shift-EndMod(45), P'Shift-End%(45)
Level 47: Laser Beam Eyes -- Apoc-Dmg(A), Apoc-Dmg/Rchg(48), Apoc-Dmg/EndRdx(48)
Level 49: Combat Jumping -- LkGmblr-Rchg+(A)
------------
Level 1: Brawl -- Dmg-I(A)
Level 1: Sprint -- Run-I(A)
Level 2: Rest -- RechRdx-I(A)
Level 1: Critical Hit
Level 4: Ninja Run
Level 2: Swift -- Run-I(A)
Level 2: Hurdle -- Jump-I(A)
Level 2: Health -- Numna-Heal/EndRdx(A), Numna-Heal(43), Numna-Regen/Rcvry+(46), Mrcl-Heal/EndRdx(46), Mrcl-Heal(46), RgnTis-Regen+(50)
Level 2: Stamina -- Efficacy-EndMod(A), Efficacy-EndMod/Rchg(39), Efficacy-EndMod/Acc/Rchg(43), Efficacy-Acc/Rchg(48), Efficacy-EndMod/Acc(50), Efficacy-EndMod/EndRdx(50) -
I was being facetious about falling. Mainly, I like it for the affect, and for being able to attack Hamidon in the LGTF for effectively.
-
Hover goes along with teleport - it's nice not to fall after TPing!

Thank you very much, I'm about to download it and check it out! -
I'm baffled. I basically copies the Fury Flechette build in post # 4 with some very minor differences and my defense is around 35% while that one is 45%.
You can see it's identical in all powers/slots that matter:
Hero Plan by Mids' Hero Designer 1.90
http://www.cohplanner.com/
Click this DataLink to open the build!
GG v2: Level 50 Magic Scrapper
Primary Power Set: Broad Sword
Secondary Power Set: Shield Defense
Power Pool: Teleportation
Power Pool: Flight
Power Pool: Fighting
Power Pool: Leaping
Ancillary Pool: Body Mastery
Hero Profile:
Level 1: Hack- (A) Crushing Impact - Accuracy/Damage
- (3) Crushing Impact - Damage/Endurance/Recharge
- (3) Crushing Impact - Damage/Recharge
- (5) Crushing Impact - Accuracy/Damage/Recharge
- (5) Crushing Impact - Accuracy/Damage/Endurance
- (A) Gift of the Ancients - Defense/Endurance
- (7) Gift of the Ancients - Defense/Endurance/Recharge
- (7) Gift of the Ancients - Defense
- (9) Steadfast Protection - Resistance/+Def 3%
- (A) Obliteration - Damage
- (9) Obliteration - Accuracy/Recharge
- (11) Obliteration - Damage/Recharge
- (11) Obliteration - Accuracy/Damage/Recharge
- (13) Obliteration - Accuracy/Damage/Endurance/Recharge
- (A) Gift of the Ancients - Defense/Endurance
- (13) Gift of the Ancients - Defense/Recharge
- (15) Gift of the Ancients - Defense/Endurance/Recharge
- (15) Gift of the Ancients - Defense
- (A) Impervium Armor - Resistance/Endurance
- (17) Impervium Armor - Resistance
- (17) Numina's Convalescence - Heal/Endurance
- (19) Numina's Convalescence - Heal/Recharge
- (19) Numina's Convalescence - Heal
- (A) Luck of the Gambler - Defense
- (21) Luck of the Gambler - Recharge Speed
- (21) Crushing Impact - Accuracy/Damage
- (23) Crushing Impact - Accuracy/Damage/Recharge
- (23) Crushing Impact - Accuracy/Damage/Endurance
- (A) Recharge Reduction IO
- (A) Recharge Reduction IO
- (25) Recharge Reduction IO
- (A) Gaussian's Synchronized Fire-Control - To Hit Buff
- (25) Gaussian's Synchronized Fire-Control - To Hit Buff/Recharge
- (27) Gaussian's Synchronized Fire-Control - To Hit Buff/Recharge/Endurance
- (27) Gaussian's Synchronized Fire-Control - Recharge/Endurance
- (29) Gaussian's Synchronized Fire-Control - To Hit Buff/Endurance
- (29) Gaussian's Synchronized Fire-Control - Chance for Build Up
- (A) Endurance Reduction IO
- (A) Range IO
- (31) Range IO
- (A) Endurance Reduction IO
- (A) Eradication - Damage
- (31) Eradication - Accuracy/Damage/Recharge
- (31) Eradication - Accuracy/Damage/Endurance/Recharge
- (33) Scirocco's Dervish - Damage/Endurance
- (33) Scirocco's Dervish - Damage/Recharge
- (A) Luck of the Gambler - Defense/Endurance
- (33) Luck of the Gambler - Defense
- (34) Luck of the Gambler - Recharge Speed
- (A) Accuracy IO
- (A) Impervium Armor - Resistance
- (34) Impervium Armor - Resistance/Recharge
- (34) Impervium Armor - Resistance/Endurance
- (A) Crushing Impact - Accuracy/Damage
- (36) Crushing Impact - Accuracy/Damage/Recharge
- (36) Crushing Impact - Damage/Endurance
- (36) Crushing Impact - Accuracy/Damage/Endurance
- (37) Crushing Impact - Damage/Endurance/Recharge
- (A) Scirocco's Dervish - Accuracy/Damage
- (37) Scirocco's Dervish - Damage/Endurance
- (37) Scirocco's Dervish - Damage/Recharge
- (39) Scirocco's Dervish - Accuracy/Damage/Endurance
- (39) Scirocco's Dervish - Accuracy/Recharge
- (A) Obliteration - Damage
- (40) Obliteration - Accuracy/Recharge
- (40) Obliteration - Damage/Recharge
- (40) Obliteration - Accuracy/Damage/Recharge
- (42) Obliteration - Accuracy/Damage/Endurance/Recharge
- (42) Obliteration - Chance for Smashing Damage
- (A) Luck of the Gambler - Recharge Speed
- (42) Gift of the Ancients - Defense/Endurance
- (43) Gift of the Ancients - Defense/Endurance/Recharge
- (A) Endurance Reduction IO
- (A) Miracle - +Recovery
- (45) Miracle - Heal
- (45) Performance Shifter - EndMod
- (45) Performance Shifter - Chance for +End
- (A) Apocalypse - Damage
- (48) Apocalypse - Damage/Recharge
- (48) Apocalypse - Damage/Endurance
- (A) Luck of the Gambler - Recharge Speed
Level 1: Brawl- (A) Damage Increase IO
- (A) Run Speed IO
- (A) Recharge Reduction IO
Level 4: Ninja Run
Level 2: Swift- (A) Run Speed IO
- (A) Jumping IO
- (A) Numina's Convalescence - Heal/Endurance
- (43) Numina's Convalescence - Heal
- (46) Numina's Convalescence - +Regeneration/+Recovery
- (46) Miracle - Heal/Endurance
- (46) Miracle - Heal
- (50) Regenerative Tissue - +Regeneration
- (A) Efficacy Adaptor - EndMod
- (39) Efficacy Adaptor - EndMod/Recharge
- (43) Efficacy Adaptor - EndMod/Accuracy/Recharge
- (48) Efficacy Adaptor - Accuracy/Recharge
- (50) Efficacy Adaptor - EndMod/Accuracy
- (50) Efficacy Adaptor - EndMod/Endurance
Code:| Copy & Paste this data into Mids' Hero Designer to view the build | |-------------------------------------------------------------------| |MxDz;1598;765;1530;HEX;| |78DAA5945B6F524110C7F7C03952CABD2DBDD00BF442A1B4207849BC249A546B535| |3922A6D9F543C85534A42801C482F3EF901EAF5C527DFB4EA47307E2213ABBE7BC1| |D9F91F28098F9E84F9EDCECECECCCECE923DBCED16E2E94DA1786F55F446239F2B9| |87ABD6E985A562F950BDAEA6A64FF824308116A2FE4B346C53052CB664D2FE67307| |35B318EE2CDD36768D6AC348E5F6CA46A5D89E06D6AA7B8669549BA9F66060A356A| |BA436C951BD6636F566B95675B1EA4EA55CDA6B7A3096C372B5E4E6D9BAA1D76912| |58A9970BA9E55AF1289FD51B4DC33C1AA5E42ED32F2FB3E4AFA58AC7848CB019C00| |E432D004546BF87A0B0B95DA8348889730EA08FD137429814BAC33223B7CA2F9BDC| |DAF79BD1FF07F8CB70B7182E726BB7DCDAE1D6AD31BCF0EE857737D969B053B5395| |6F9E3C03D453A1AC8015B8C0265E1E03C5AAA638855434100471DC6E18671B82899| |3B91B4702EB2CA43015D08A8B8A01A0576C8D88315CDF38E4F31FA9E113A013E302| |63E029F185EF2E7533823E19B66473172144054259060D514E0A495412B9F41181B| |A40A5A750D7EB5C9524F7D034E199103B68B1C327C146E0449DA46FC7CF208EA308| |D3A28E46FCC0A3116E23D76528D5B7BC651DCE928808AEF3A6420E430893ACEA28E| |B33A8072CEA18F4A641EB6CCC3FB584192734872FE0970C40850CA3330D766D0393| |1744E0C9D1343E72CA07316849DDB938244ADA4A338DA02FA288106DA24B3380C44| |1CB53CA1488B56D32DDE65ABA535E035FB5E7AC3D8A2AD2964644B2DB1EA7C12483| |3862978DA2A621AC127D4CEB342B13262BD5B9564D586DA792542415B85D5CE03FB| |AFEFB3BB1DCD79BF9FE4A6141B24946D397A20C543397D2447BA143B725A90A3D69| |7CE6EDF1599D05529AE49715D8AA09FC4B1B474B848B8A4704BE191C22B854F0ABF| |14835284A4782B45CB499BED3874EB5486B46E45414DBE77ABE2ACFA71A6D214BCF| |3041E78721B58E16B4BE2F63237F82FE867F7AE63BEA8F9678CC473DCDE0B46E625| |F08A91EEBE25594891E8D1647A34977A34177B346777F30F45791E71| |-------------------------------------------------------------------|
-
Thanks! I've downloaded both builds and am playing around with them. I obviously don't want to lose my purples, so am trying to figure out there to slot those while also taking advantage of the other bonuses in your builds.
-
I'm very new to using Mids, so I hope I've done it right. I want to try to get his defense and/or damage resistance up, but am not sure how or really if it needs to be much higher to begin with. Any help or advice would be much appreciated!
Hero Plan by Mids' Hero Designer 1.90
http://www.cohplanner.com/
Click this DataLink to open the build!
Gentleman Gladiator: Level 50 Magic Scrapper
Primary Power Set: Broad Sword
Secondary Power Set: Shield Defense
Power Pool: Teleportation
Power Pool: Fighting
Power Pool: Flight
Ancillary Pool: Body Mastery
Hero Profile:
Level 1: Hack- (A) Crushing Impact - Accuracy/Damage: Level 50
- (3) Crushing Impact - Damage/Endurance: Level 50
- (7) Crushing Impact - Damage/Recharge: Level 50
- (13) Crushing Impact - Accuracy/Damage/Recharge: Level 50
- (23) Crushing Impact - Accuracy/Damage/Endurance: Level 50
- (25) Crushing Impact - Damage/Endurance/Recharge: Level 50
- (A) Defense Buff IO: Level 50
- (5) Defense Buff IO: Level 50
- (9) Defense Buff IO: Level 50
- (13) Resist Damage IO: Level 50
- (25) Resist Damage IO: Level 50
- (29) Resist Damage IO: Level 50
- (A) Mako's Bite - Damage/Endurance: Level 50
- (3) Mako's Bite - Damage/Recharge: Level 50
- (11) Mako's Bite - Accuracy/Damage/Endurance/Recharge: Level 50
- (31) Mako's Bite - Chance of Damage(Lethal): Level 50
- (A) Touch of Lady Grey - Defense Debuff: Level 50
- (5) Touch of Lady Grey - Defense Debuff/Recharge: Level 50
- (11) Touch of Lady Grey - Defense Debuff/Recharge/Endurance: Level 50
- (31) Touch of Lady Grey - Recharge/Endurance: Level 50
- (31) Touch of Lady Grey - Defense Debuff/Endurance: Level 50
- (46) Touch of Lady Grey - Chance for Negative Damage: Level 50
- (A) Defense Buff
- (7) Defense Buff
- (36) Defense Buff
- (A) Luck of the Gambler - Defense/Recharge: Level 50
- (9) Luck of the Gambler - Defense/Endurance/Recharge: Level 50
- (15) Damage Increase IO: Level 50
- (A) To Hit Buff IO: Level 50
- (A) Recharge Reduction IO: Level 50
- (A) Time & Space Manipulation - Range: Level 50
- (15) Time & Space Manipulation - +Stealth: Level 50
- (50) Range
- (50) Range
- (A) Healing IO: Level 50
- (17) Healing IO: Level 50
- (17) Healing IO: Level 50
- (37) Resist Damage IO: Level 50
- (39) Resist Damage IO: Level 50
- (39) Resist Damage IO: Level 50
- (A) Scirocco's Dervish - Accuracy/Damage: Level 50
- (19) Scirocco's Dervish - Damage/Endurance: Level 50
- (19) Scirocco's Dervish - Damage/Recharge: Level 50
- (23) Scirocco's Dervish - Accuracy/Recharge: Level 50
- (37) Scirocco's Dervish - Accuracy/Damage/Endurance: Level 50
- (37) Scirocco's Dervish - Chance of Damage(Lethal): Level 50
- (A) Recharge Reduction IO: Level 50
- (21) Recharge Reduction IO: Level 50
- (21) Endurance Reduction IO: Level 50
- (A) Endurance Reduction IO: Level 50
- (A) Damage Increase IO: Level 50
- (A) Crushing Impact - Accuracy/Damage: Level 50
- (27) Crushing Impact - Damage/Endurance: Level 50
- (27) Crushing Impact - Damage/Recharge: Level 50
- (42) Crushing Impact - Accuracy/Damage/Endurance: Level 50
- (43) Crushing Impact - Damage/Endurance/Recharge: Level 50
- (43) Damage Increase
- (A) Luck of the Gambler - Defense/Endurance: Level 50
- (29) Luck of the Gambler - Defense/Endurance/Recharge: Level 50
- (42) Luck of the Gambler - Defense: Level 50
- (43) Luck of the Gambler - Recharge Speed: Level 50
- (A) Endurance Reduction
- (A) Armageddon - Damage: Level 50
- (33) Armageddon - Damage/Recharge: Level 50
- (33) Armageddon - Accuracy/Damage/Recharge: Level 50
- (33) Armageddon - Accuracy/Recharge: Level 50
- (34) Armageddon - Damage/Endurance: Level 50
- (34) Armageddon - Chance for Fire Damage: Level 50
- (A) Endurance Reduction
- (A) Scirocco's Dervish - Accuracy/Damage: Level 50
- (39) Scirocco's Dervish - Damage/Endurance: Level 50
- (40) Scirocco's Dervish - Damage/Recharge: Level 50
- (40) Scirocco's Dervish - Accuracy/Damage/Endurance: Level 50
- (40) Scirocco's Dervish - Chance of Damage(Lethal): Level 50
- (42) HamiO:Centriole Exposure
- (A) Recharge Reduction
- (A) Numina's Convalescence - Heal: Level 50
- (45) Numina's Convalescence - +Regeneration/+Recovery: Level 50
- (45) Healing IO: Level 50
- (45) Endurance Modification IO: Level 50
- (46) Endurance Modification IO: Level 50
- (46) Endurance Modification IO: Level 50
- (A) Apocalypse - Damage: Level 50
- (48) Apocalypse - Damage/Recharge: Level 50
- (48) Apocalypse - Accuracy/Damage/Recharge: Level 50
- (48) Apocalypse - Chance of Damage(Negative): Level 50
- (A) Endurance Reduction
Level 1: Brawl- (A) Damage Increase IO: Level 50
- (A) Run Speed IO: Level 50
- (A) Healing IO: Level 50
Level 4: Ninja Run
Level 2: Swift- (A) Run Speed
- (A) Jumping
- (A) Healing IO: Level 50
- (34) Healing IO: Level 50
- (50) Healing IO: Level 50
- (A) Endurance Modification IO: Level 50
- (36) Endurance Modification IO: Level 50
- (36) Endurance Modification IO: Level 50
Set Bonus Totals:- 9% DamageBuff(Smashing)
- 9% DamageBuff(Lethal)
- 9% DamageBuff(Fire)
- 9% DamageBuff(Cold)
- 9% DamageBuff(Energy)
- 9% DamageBuff(Negative)
- 9% DamageBuff(Toxic)
- 9% DamageBuff(Psionic)
- 3.125% Defense(Fire)
- 3.125% Defense(Cold)
- 3.125% Defense(Psionic)
- 6.25% Defense(AoE)
- 27.5% Enhancement(RechargeTime)
- 67% Enhancement(Accuracy)
- 125.5 HP (9.372%) HitPoints
- MezResist(Immobilize) 7.7%
- 6.5% (0.109 End/sec) Recovery
- 84% (4.696 HP/sec) Regeneration
- 2.52% Resistance(Fire)
- 2.52% Resistance(Cold)
- 6.25% Resistance(Negative)
- 5% Resistance(Toxic)
- 2.5% Resistance(Psionic)
Set Bonuses:
Crushing Impact
(Hack)- MezResist(Immobilize) 2.2%
- 15.06 HP (1.125%) HitPoints
- 7% Enhancement(Accuracy)
- 5% Enhancement(RechargeTime)
- 2.5% Resistance(Psionic)
(Slash)- MezResist(Immobilize) 3.3%
- 20.08 HP (1.5%) HitPoints
- 3% DamageBuff(All)
(Slice)- 20.08 HP (1.5%) HitPoints
- 2.5% (0.042 End/sec) Recovery
- 8% (0.447 HP/sec) Regeneration
- 2% DamageBuff(All)
- 11% Enhancement(Accuracy)
(Parry)- 10% (0.559 HP/sec) Regeneration
(Teleport)- 8% (0.447 HP/sec) Regeneration
(Whirling Sword)- 10% (0.559 HP/sec) Regeneration
- 3.125% Resistance(Negative)
- 9% Enhancement(Accuracy)
- 3.125% Defense(AoE), 1.563% Defense(Fire), 1.563% Defense(Cold)
- 3.125% Defense(Psionic)
(Disembowel)- MezResist(Immobilize) 2.2%
- 15.06 HP (1.125%) HitPoints
- 7% Enhancement(Accuracy)
- 5% Enhancement(RechargeTime)
(Phalanx Fighting)- 10% (0.559 HP/sec) Regeneration
- 15.06 HP (1.125%) HitPoints
- 9% Enhancement(Accuracy)
- 7.5% Enhancement(RechargeTime)
(Head Splitter)- 4% (0.067 End/sec) Recovery
- 2.52% Resistance(Fire,Cold)
- 15% Enhancement(Accuracy)
- 10% Enhancement(RechargeTime)
- 5% Resistance(Toxic)
(Shield Charge)- 10% (0.559 HP/sec) Regeneration
- 3.125% Resistance(Negative)
- 9% Enhancement(Accuracy)
- 3.125% Defense(AoE), 1.563% Defense(Fire), 1.563% Defense(Cold)
(Physical Perfection)- 12% (0.671 HP/sec) Regeneration
(Laser Beam Eyes)- 16% (0.894 HP/sec) Regeneration
- 40.16 HP (2.999%) HitPoints
- 4% DamageBuff(All)
Code:| Copy & Paste this data into Mids' Hero Designer to view the build | |-------------------------------------------------------------------| |MxDz;1630;751;1502;HEX;| |78DAA594DB6E12511486F73050A41CA714DBD203A5275A0A63D19AF4A031A9D5A68| |9248DB4BD52E90053181D67C830698BDEF800BE82B7BE83F1053C3E8A8737C0B5D7| |DA50089792F4FF989FBDD75AF3CF9E16AFF6438CBD7BC0A4C843536BB5CAA5AAA33| |59BBAE32B6A75A31A3FD02DD7D45F6BD6FC81A9D50CCDB51D3F632CD95D562EEAA6| |AEAB7B8EADD5CAA54BDBA9A57A3FEDEBE7BAD5D2D552C3D0CD5AF75239B41ABA036| |5D5EE97B123DB36D56328D4B41D57730DDB0AA3F5D8A8375CC3AA07E9CAE4970A7E| |3FB42E8C9651314CC36D2B8F9A4655DDB36BED72516BB9BAD39E8409EFC25F998F8| |A9F8E8F9D010ACCA321462A88501571B38698D411A361802476CDA1E525DC208472| |B49C304338F38B4DAC234B75EAD5A07A2F1173AF101AAC93C54CF2170F56FF8A18F| |D8698FB4EF881C8FF440461261FCDE4F179015E998D082E0A56A1B21F67E878FC8A| |8403C71191596C5D8105016ACD02B7D15A062B28ACE03A5A19B0C2D44A0E47B07B2| |48A28C4A8519721182A2A828A2EE1E6D80096289A9501E8505F11012817688D5D12| |AEE869B469F31BC25B44187AC56997274E838E0BA41111589090F0EE59822C093A4| |D889B9BA008CEC19A12CDA7E84424E94424E944ACD151C8D251C8CA74A751283E2D| |32998E61A63314EDDA38229B40C8507E96D6B1593FEDAD0353A2656A0B839CDF26E| |C107611E97B84FB742660D782A8B4202A2930C5B2A8B44CC9AD5072194A2E439165| |28B2B54DDA56829B581531AC2AE47D8452EBE2D1AD9FE0ECB953023DBADC3C223F8| |013A8A48A33AEE670CE5B79824A28200230F086E8B821869FF1F6DE45C808CB3DE9| |B7F2681D797B6F1193689294B7F73AFED7E753A8DB2DF07414F498CB1197532ECFB| |83CE7F2828BC6A5C2A5CAA5F3B9B73BBAC507DAE6B2C365974B82BF12EFF94A3F7F| |9D825C425CC25C225CA25C625CE25C925C3E70E90462BD7F099D5F504312CF5D8A5| |374BFFBBD08797FAE3D8F082A4D2810FEF62FA0C7B738808DFEF479402C3BE41486| |9CCD21E7CE90739DF93F4B9E1961| |-------------------------------------------------------------------|
-
This is definitely a must buy for me. Can't wait!
-
I am of course having the same issue, and also couldn't log into Virtue last night. Kept getting a "database error." Grr.
-
So, is the general consensus still that a triform PB can survive and prosper without the fitness pool?
-
Well, I'm glad I posted about this. I assumed it was a game-wide problem, but now I know that apparently Virtue is the only server affected. Doesn't make it more palatable, but at least we're starting to see where the problem lies.
I'd love to find out if anything is being done about it. -
I hear people on Virtue complaining about it all the time. If it is cross server, how could it affect Virtue and not other servers?
-
I've heard a lot of people complaining about it, so I know it's not just me. What server are you on? I'm on Virtue, maybe it's worse on Virtue and Freedom because of the population.
-
I'm sure this has been discussed somewhere before on here, but I can't find it, and am extremely frustrated with CoX right now.
As anyone who has tried to use WW since issue 17 knows, it's almost unworkable. You'll drag, say, a piece of salvage into the WW window, and it immediately shows back up in your inventory. Sometimes I have to drag it 5-6 times before it finally sticks. And then there's pricing. I'll put the price in, click post, and the price window goes blank. I do it again, it goes blank again, keeping the item in "Stored" rather than putting it in "Selling" where it belongs. 3-4 tries later, it finally works.
This has been going on since day one of issue 17. Can't this be fixed? Sure, the new interface looks nicer, but the old interface - for the most part - actually worked. Wentworth as it stands right now has really frustrated me and brought down my enjoyment of the game quite a bit. What was once a 5 min trip to WW to sell after a successful mission has turned into 30 minutes of drag and drop hell. -
Missed it by THAT much!!
-
1) How often do you PuG instead of grouping within your SG or friends?
Probably 75% of the time, maybe more.
2) How often do you group with friends and fill the rest of the group with PuGs?
Maybe 10% of the time.
3) How often do your PuG members do what you feel needs to be done without being told to do so?
I rarely have problems with this, and if I do... they tend to be weeded out.
4) How often do you find yourself telling PuG members what you feel they should be doing (for the good of the current team/session)?
Most people I team with play fairly well.
5) How often do you find yourself adding PuG members to your friends/global friends, and if those lists are full, using other methods of remembering them?
I maybe add a new friend from a PuG 1 out of 10 times.
6) How often do you group with complete jerks in a PuG?
Rarely. Most people, I've found, are decent and want to have fun. Jerks tend to get themselves eliminated from the team. -
Not only does CoX not support SLI, it apparently actively hates it. On e hunch I removed one of my two GeForce 9800 GTX+ cards (I had already tried simply disabling SLI mode to no avail) and, like magic, the black squares disappeared. No clue why, but I'm happy that I can at least play now without seeing garbage flicker across my screen every few seconds.
-
dual nVidia 9800GTXs with the 197.45 drivers.
-
You guys are a riot. :P That said, I'm still getting these black squares, and still frustrated as hell.
-
Quote:Well, misery loves company, but it sure is irritating.Originally Posted by Zombie Man

-
I've tried changing every last option, I think, and... I still get the black squares.
-
I am adding a screen shot I managed to take of the issue.
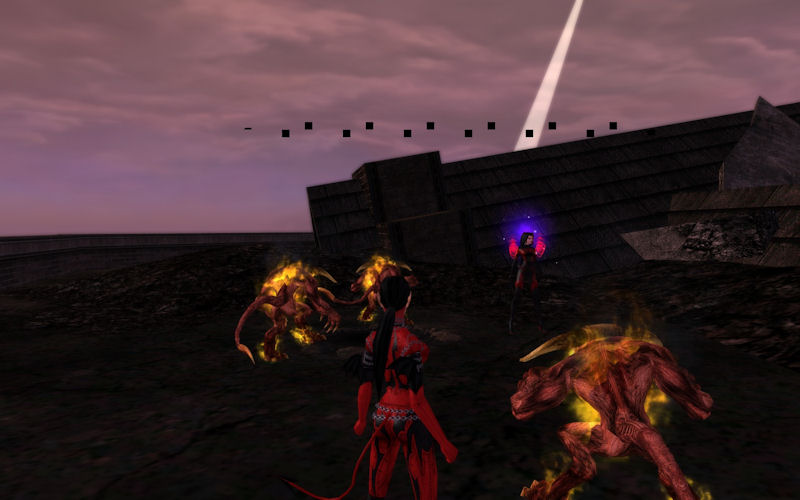
-
Every few seconds, a line of what looks like little black boxes (it moves to fast to really see them) zips across my screen. I've changed the settings all around but nothing stops it. I've turned ultra mode completely off and it still does it. Sometimes it's at the top of the screen, sometimes the middle, sometimes the bottom. This didn't happen pre-i17, so it's definitely something with i17.
I am running dual 9800GTX video cards on a Windows Vista 64-bit 2.5GHx machine with 8GB of Ram. -
My system is actually a made-to-order system from Cybertron. Two years ago, it was the best of the best. Time flies.
-
I'm going to give it until ATI releases 10.4 drivers and if things aren't nice and fast by then, I'm sticking my old cards back in and will sell the 5870. (They are selling on eBay for just about what I paid for it on Newegg.) I want pretty shadows and water and such, but I'd rather have a non-choppy, fast frame rate. I'm sure the issue is my 2.5 GHz CPU, but I have no clue how to overclock it and have heard enough horror stories that I don't really want to try.