Extra Fancy Character Portrait
By
GuyPerfect,
Posted on: 2011-08-20 13:13 in Multi-Media Fan Creations
Nicely done! 
"It's hard for you to be yourself, if you don't know who you really are."

Okay I'd LOVE to see a tutorial on how you did this! This is something I've tried very unsuccessfully to do myself. I am totally self taught on Photoshop so I know I'm only using about 5% of what it CAN do...

Quote:
THIS image in particular was abnormal enough that I A) couldn't process it using my normal methods and B) it didn't matter because I was able to process it without them. I'll still tell you how I did it, but this "tutorial" will only help you in a very small subset of potential poses. At some point tomorrow, however, I plan to make a similar image of my other petless Mastermind, and that one should be more typical of the process I use.|
Originally Posted by PowerStream

Okay I'd LOVE to see a tutorial on how you did this!
|
First off, you absolutely must know your way around demo editing, particularly -demodumptga and -demofps. It's far too broad a subject to cover in this post, but if you want the best shots, you need to start there. Next, I'll make it known that when I take character screenshots from demo playback, I modify the game in order to inject my own background color. I don't want to encourage people to make their own mods just for screenshots, but it should still be said that I have a magic wand.
Finally, I developed custom software to do some of the image processing for me. It's nothing fancy, but my needs were so specific that my likelihood of finding any software out there that did what I needed it to do were slim to none. I'll describe the algorithms I used.
With that out of the way, I took my character into the game and did a quick demo record of Crack Whip to get the animation, costume and power customization I wanted for the picture. I was able to use the demo playback to produce the full-size version of this image:

The bad news was that even using -demofps 1000 and comparing adjacent frames, something about the Hellfire FX caused drastic differences even with a one-millisecond frame difference. Normally I take two screenshots with different backgrounds and process the colors from there, but with things changing so much, that approach was worthless here.
The good news is that... well, there really wasn't any good news. While I usually generate my alpha masks from multiple images, I had to do this one by hand. I opened up an image editor and painstakingly blotted out the parts that are meant to be fully opaque, while also removing excessive Hellfire from the frame:
How can that possibly be helpful? Well, it matters because of how transparency works in computers: they call it alpha blending. Basically, pixels have four channels, each a fraction in the range of 0.0 to 1.0. The four channels correspond with the red, green and blue light, and the "alpha" value, where 0.0 is fully transparent and 1.0 is fully opaque.
The blending formula, for all three color channels, is as follows:
Result = Foreground * Alpha + Background * (1.0 - Alpha)
By creating an alpha mask, I solve part of that equation: Alpha
The original image is also part of that equation: Result
And we also know what Background is: black happens to be 0.0
So our formula looks like this:
Result = Foreground * Alpha + 0.0 * (1.0 - Alpha)
Result = Foreground * Alpha
Foreground = Result / Alpha
So by writing a custom program to use the pixels from the original image (Result) and the alpha mask (Alpha), I was able to calculate with reasonable accuracy what the original RGB values must have been:
The shrunken image is a bit misleading: the result of this process is NOT anti-aliased. It's the actual RGB color data of the final image, using the alpha mask from before.
While I was in the program code, I also had it remove any rows and columns from the edges of the image that were totally empty, and had it save the image as a 32-bit BMP. Turns out the Microsoft bitmap file format supports an alpha channel, but just about no image editors support it. Java (the programming language) does in its ImageIO class, so I just used that to read in the .bmp and save as .png... Yeah, I know. I'm lazy.
The result is above in the first post, in all its transparent glory.
Quote:
|
Originally Posted by GuyPerfect
Yeah, I know. I'm lazy.
|


I'll be over ----> trying to wrap my brain around this....
Thank you though!
Quote:
I'd find that much more amusing of a statement if it were a necro MM. |
Originally Posted by GuyPerfect
I have a history of image manipulation; chiefly decomposing images
|
Veddy nice, though.

Okay, got a new one ready. This time, I did not use any game mods, so the process I'm about to show you can be used by anyone... well, anyone with the right resources, that is.
Even though this petless Mastermind is Thugs, I still decided that the Suppressive Fire animation from Dual Pistols was just the ticket, so I grabbed it. I also have a sparkly combat aura and Shark Skin for extra flare.
Using demo editing, I was able to create this pose:

One of the quirks about random particles like those shinies and sparklies is that they're never the same twice. Even if you run two rounds of -demodumptga and select frame number 583 both times, the particles will be different. So snagging those pixels on two different backgrounds is an interesting challenge.
If you've done the Eden Trial, you'll be familiar with the Rock Wall. You can use this entity in demo edits with NPC identifier Devouring_Rock_Wall. Why bother? Well, it's really big, which means you can use it as a backdrop. By inserting that object into the frame 1 millisecond after the above image, we get this:

Now we have roughly the same image on two different backgrounds. There's technically a slight change due to animations and the fact that 1 millisecond has elapsed, but for the purposes of processing an Extra Fancy image, it's generally sufficient.
Like I mentioned before, the Hellfire didn't cooperate when doing this. Those particles seem to be animated on a per-frame basis rather than a strict set of time rules. But Shark Skin and Body Sparkles Light - Combat seem to work just fine.
So what's the purpose of using two images like this? It helps with producing an alpha mask. Think back to middle school when you went over the Distance Formula (which is an application of Pythagoras' Theorem, which itself is a specific form of the Law of Cosines). Given any two points (X1, Y1) and (X2, Y2), we can calculate the distance between them with the following function:
Distance = Sqrt( (X2 - X1) ^ 2 + (Y2 - Y1) ^ 2 )
Turns out that works in 3D just the same:
Distance = Sqrt( (X2 - X1) ^ 2 + (Y2 - Y1) ^ 2 + (Z2 - Z1) ^ 2 )
Okay, so this isn't trigonometry class. However, checking the likeness of two colors is done the same way... Mind blown yet? To figure out how similar two colors are to one another, you can just plug their RGB channels into the distance formula as a substitution for XYZ. Seriously, it really works that way.
In order for the two images to have any context in the distance formula, we have to know what we're comparing them to. Namely, the original backgrounds that the character was overlaid onto. The first one is easy: it's just the solid color RGB(61, 134, 178). The second one's an arbitrary image, though, so I simply snagged a picture of it sans petless Mastermind:

Alpha Generation
The concept is as follows:
* The color distance of two pixels in an alpha-blended image on two backgrounds can never be greater than the color distance of the corresponding pixels in the backgrounds themselves.
* If we take the color distance of the overlaid pixels and divide by the color distance of the same pixel on the backgrounds, we'll have a normalized value that happens to correspond with the alpha of that pixel... roughly.
* The resulting alpha is inverted: we need to subtract it from 1.
To accompany that bulleted list, an algorithm:
Code:
If it doesn't make total sense, don't sweat it. The fact is, it works:For Y = 0 To Height - 1
For X = 0 To Height - 1
Pixel1 = Pixel of Bob on the blue background
Pixel2 = Pixel of Bob on the Rock Wall background
Back1 = Solid blue pixel
Back2 = Rock Wall pixel
MaxDist = Distance(Back1, Back2)
Dist = Distance(Pixel1, Pixel2)
Alpha = 1 - Dist / MaxDist
Next X
Next Y

Due to loss of precision for working with 8 bits per color channel, alpha masks generated via this method are not perfect. They're pretty good, but as you'll see in the final image, there was some level of detail that didn't make it out alive.
Again, here is the formula for alpha blending:
Result = Foreground * Alpha + Background * (1.0 - Alpha)
We know Alpha now. Let's use the first image, the one on the blue background, as Result. This also gives us Background, which is the exact shade of blue ( RGB(61, 134, 178) ) we're working with. All we need to do now is solve for Foreground:
Result = Foreground * Alpha + Background * (1.0 - Alpha)
Result - Background * (1.0 - Alpha) = Foreground * Alpha
Foreground = ( Result - Background * (1.0 - Alpha) ) / Alpha
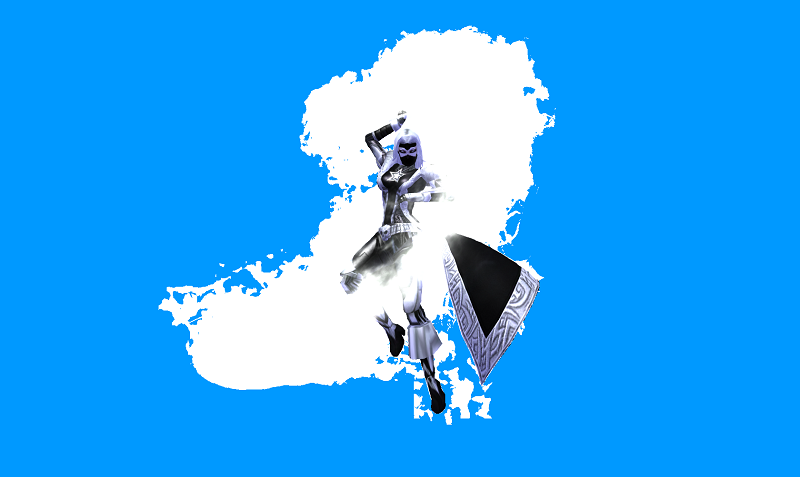
Running the first image through that formula with the given Alpha and Background produces this image:

Woah nelly! Talk about ugly! But that's fine, it doesn't need to be pretty. Using the alpha mask and that uggo image together actually produces this:

Like I mentioned before, there is some loss of precision when you do this; the resulting RGB and Alpha are not necessarily the same as what were actually used in the original images. This one looks pretty good, but look in the top-right corner: those circles are missing some spots.
The alpha channel itself was actually borked from the outset:

So a I took a few minutes to pull both the RGB and alpha images into an image editor to clean them up a little bit. Corrected some colors, fixed up the alpha mask, removed excessive particles, adjusted gamma, etc.
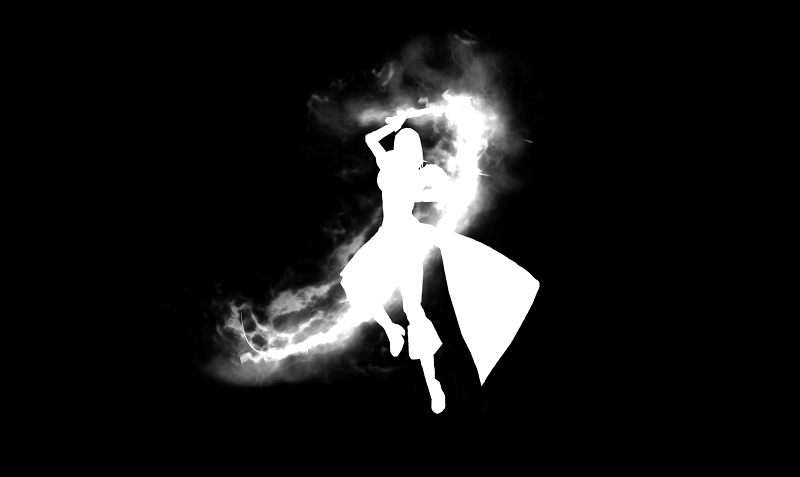
And the final result, much to my delight, is the following image:

I have a history of image manipulation; chiefly decomposing images to their source rasters (Vanden's icon pack uses an "icon compiler" program I made) and discerning transparency in otherwise totally opaque images.
I also have a history of taking a liking to the characters I make and it's not unusual for me to take a fancy screenshot of them, usually on my patented white background. And if I'm feeling frisky, I'll find a cool pose to put them in and maybe even find a good background to put them on. And if I'm feeling really frisky, I'll go through the trouble of establishing a transparent alpha channel.
But this latest character, it's a treasure. I actually started it mere hours before someone started up that petless Mastermind thread, which is uncanny because this character is destined to be a petless Mastermind. After the unexpected success of my previous petless Mastermind, I decided to step it up a notch and make one as awesome as my resources would allow.
Since this will be my flagship character by the time it's all said and done, I figured an extra-fancy image was in order for it. A little demo editing here, a little image processing there, and for the first time ever (for me), some manual touching up, I present to you the extra fancy character portrait of XN-Trix (who, by the way, really does have just a black and white costume):
To round out the epicness, this petless Mastermind image was processed in part by GIMP.